
Claude Code
Connect Claude Code to StoryClaw through CC Switch and use the full Claude model lineup on macOS, Windows, and Linux.
Connect Claude Code to StoryClaw through CC Switch — no manual environment variables required — and use the full Claude model lineup on macOS, Windows, and Linux. Pick the guide for your operating system below.
Prerequisites
- macOS 10.15 (Catalina) or later
- A Node.js environment (version 18 or higher)
- A valid StoryClaw API key
- The CC Switch desktop app
Installation
Install Node.js
Claude Code needs a Node.js environment to run.
Option 1: Homebrew (recommended). If you already have Homebrew, it's the easiest way to install Node.js:
# Update Homebrew
brew update

# Install Node.js
brew install node
If you don't have Homebrew yet, visit brew.sh or run the following command in your terminal to install it:
/bin/bash -c "$(curl -fsSL https://raw.githubusercontent.com/Homebrew/install/HEAD/install.sh)"Option 2: Download from the website. Visit nodejs.org, download the .pkg installer for the "LTS" release, and follow the wizard (the defaults are fine).
Verify the Node.js installation:
node --version
npm --version
Seeing version numbers means the install worked. Your Node.js version should be ≥ 18.
macOS notes: you may need sudo for permission issues; the system may prompt you with a security setting the first time you run certain commands; we recommend Terminal or iTerm2 as your terminal.
Install Claude Code
Open a terminal and run:
# Install Claude Code globally
npm install -g @anthropic-ai/claude-code
If you hit permission denied, use sudo npm install -g @anthropic-ai/claude-code.
Verify the installation:
claude --versionSeeing a version number means the install worked. If the command isn't found, reopen your terminal and try again.
Get your StoryClaw API key
Log in to the StoryClaw console, create and copy a key on the API Keys page — you'll need it for the CC Switch configuration below.
Configure with CC Switch
Once Claude Code is installed, use the CC Switch desktop app to switch it over to StoryClaw with one click — no environment variables to edit by hand.
Haven't installed CC Switch yet? Install CC Switch first, then follow the configuration steps below.
Add StoryClaw as a provider
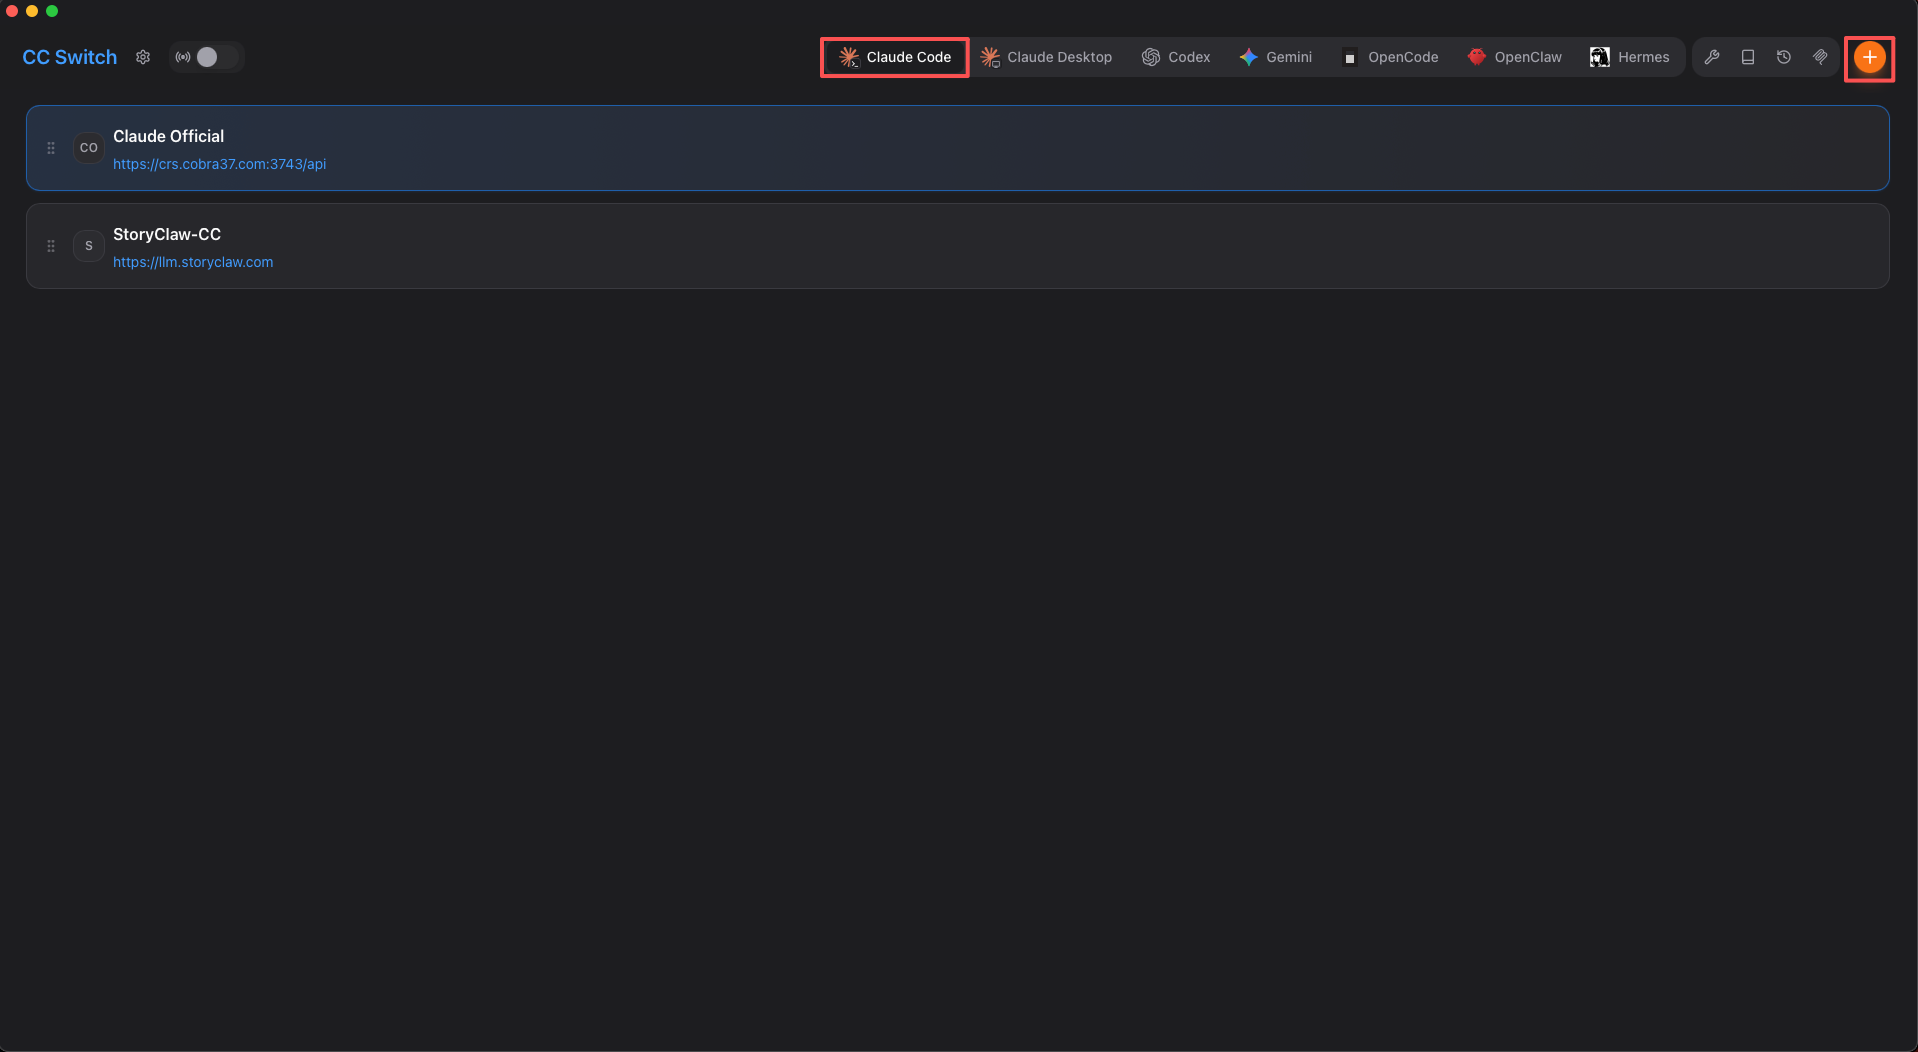
Launch CC Switch, click the Claude Code tab at the top, then click the + button in the top-right corner.
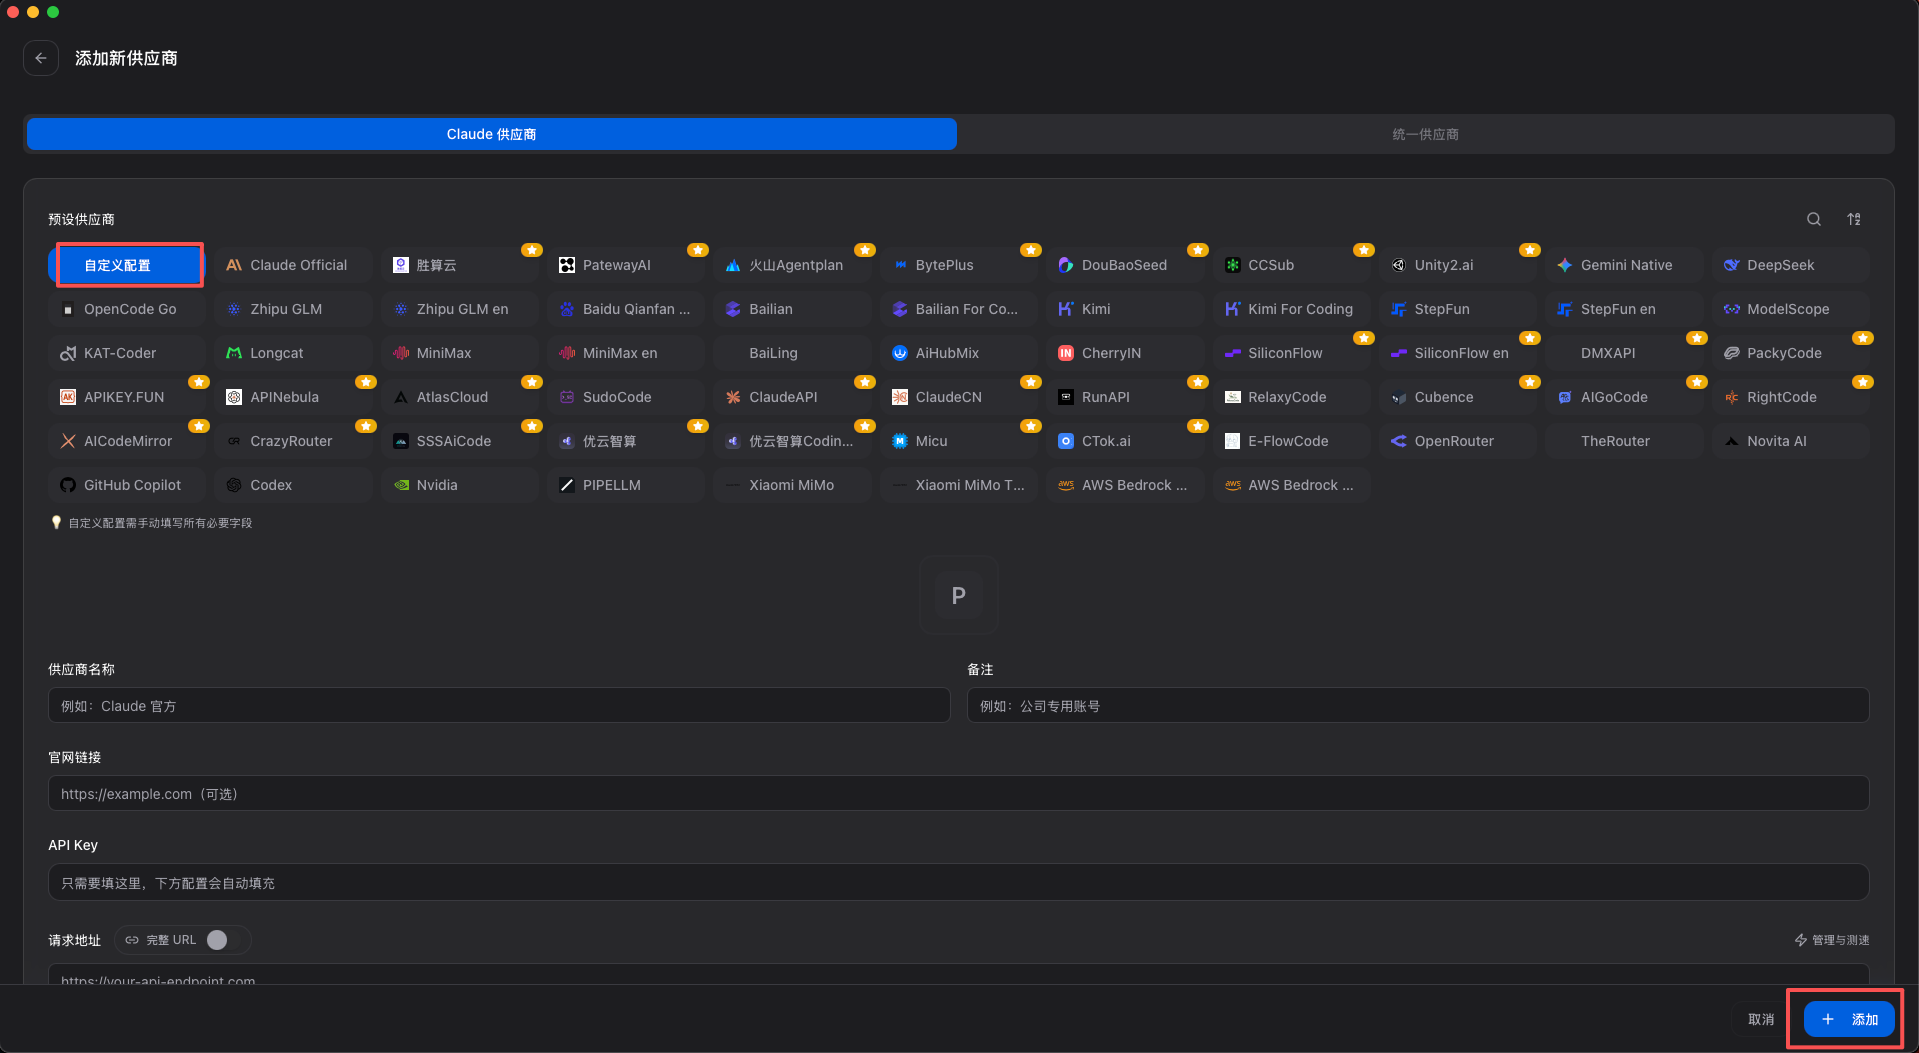
In the "Add New Provider" dialog, click Custom Configuration, then click Add.
Edit the configuration details
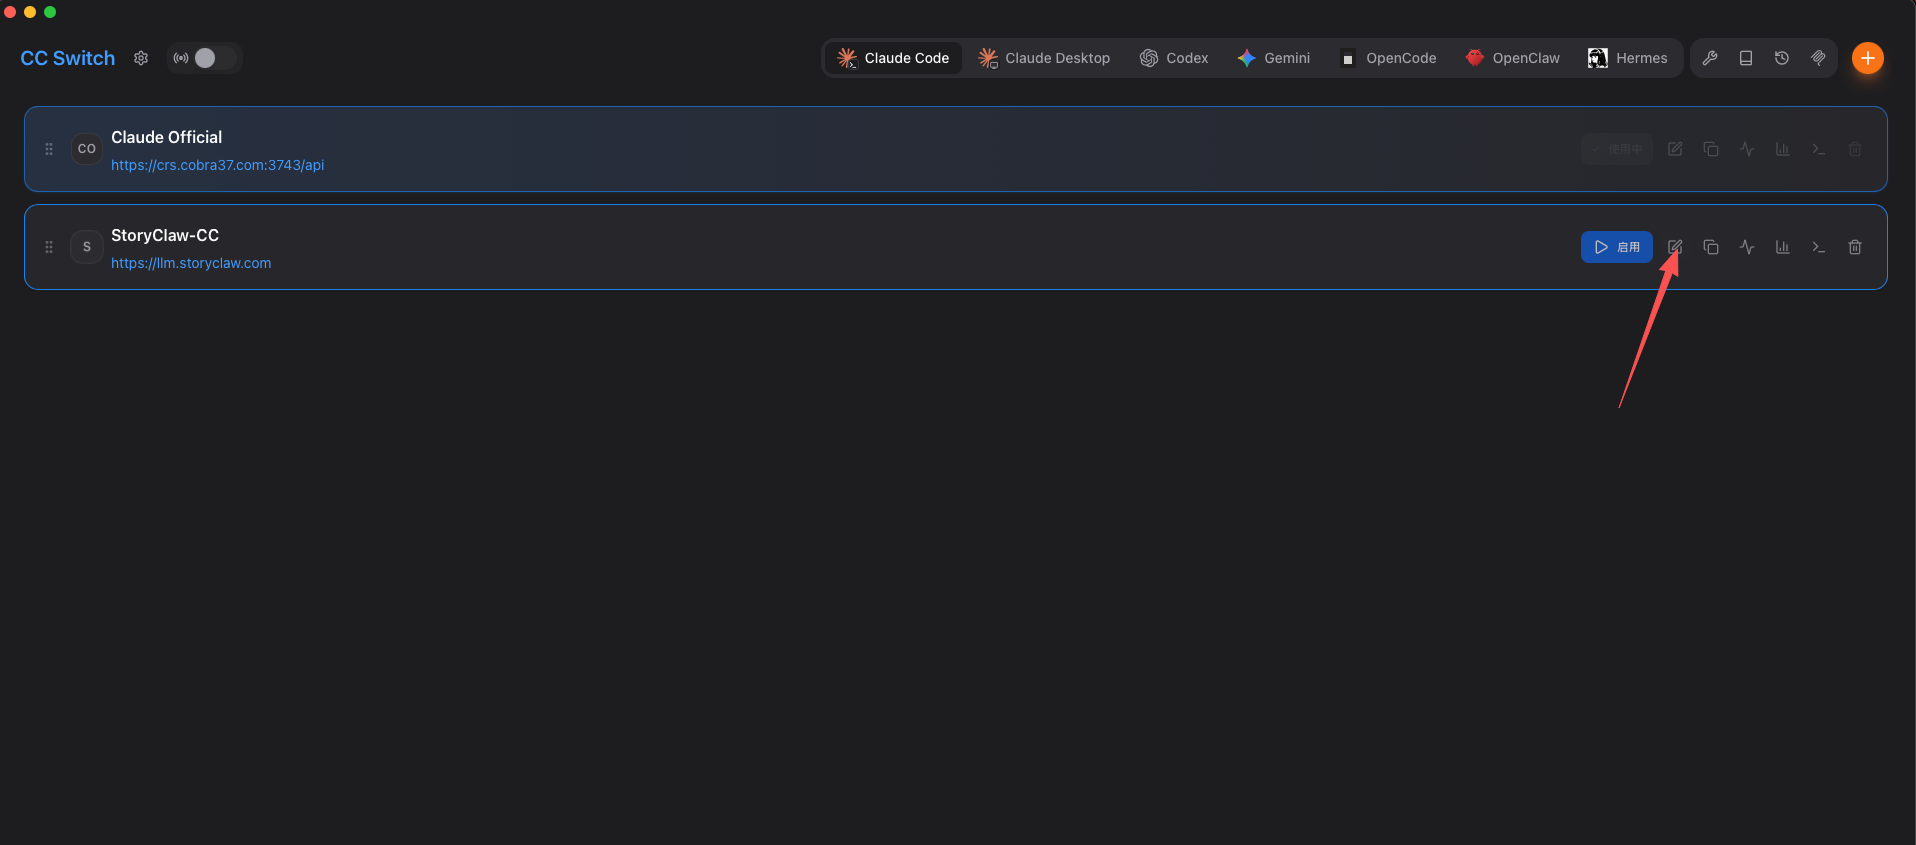
Once added, find the new entry in the list and click the edit icon (pencil) on its right to open the "Edit Provider" page. Fill in the fields as follows:
| Field | Value |
|---|---|
| Provider Name | Anything you like, e.g. StoryClaw-CC |
| API Key | Your StoryClaw API key |
| Request URL | https://llm.storyclaw.com |
| API Format | Anthropic Messages (native) |
| Auth Field | ANTHROPIC_API_KEY |
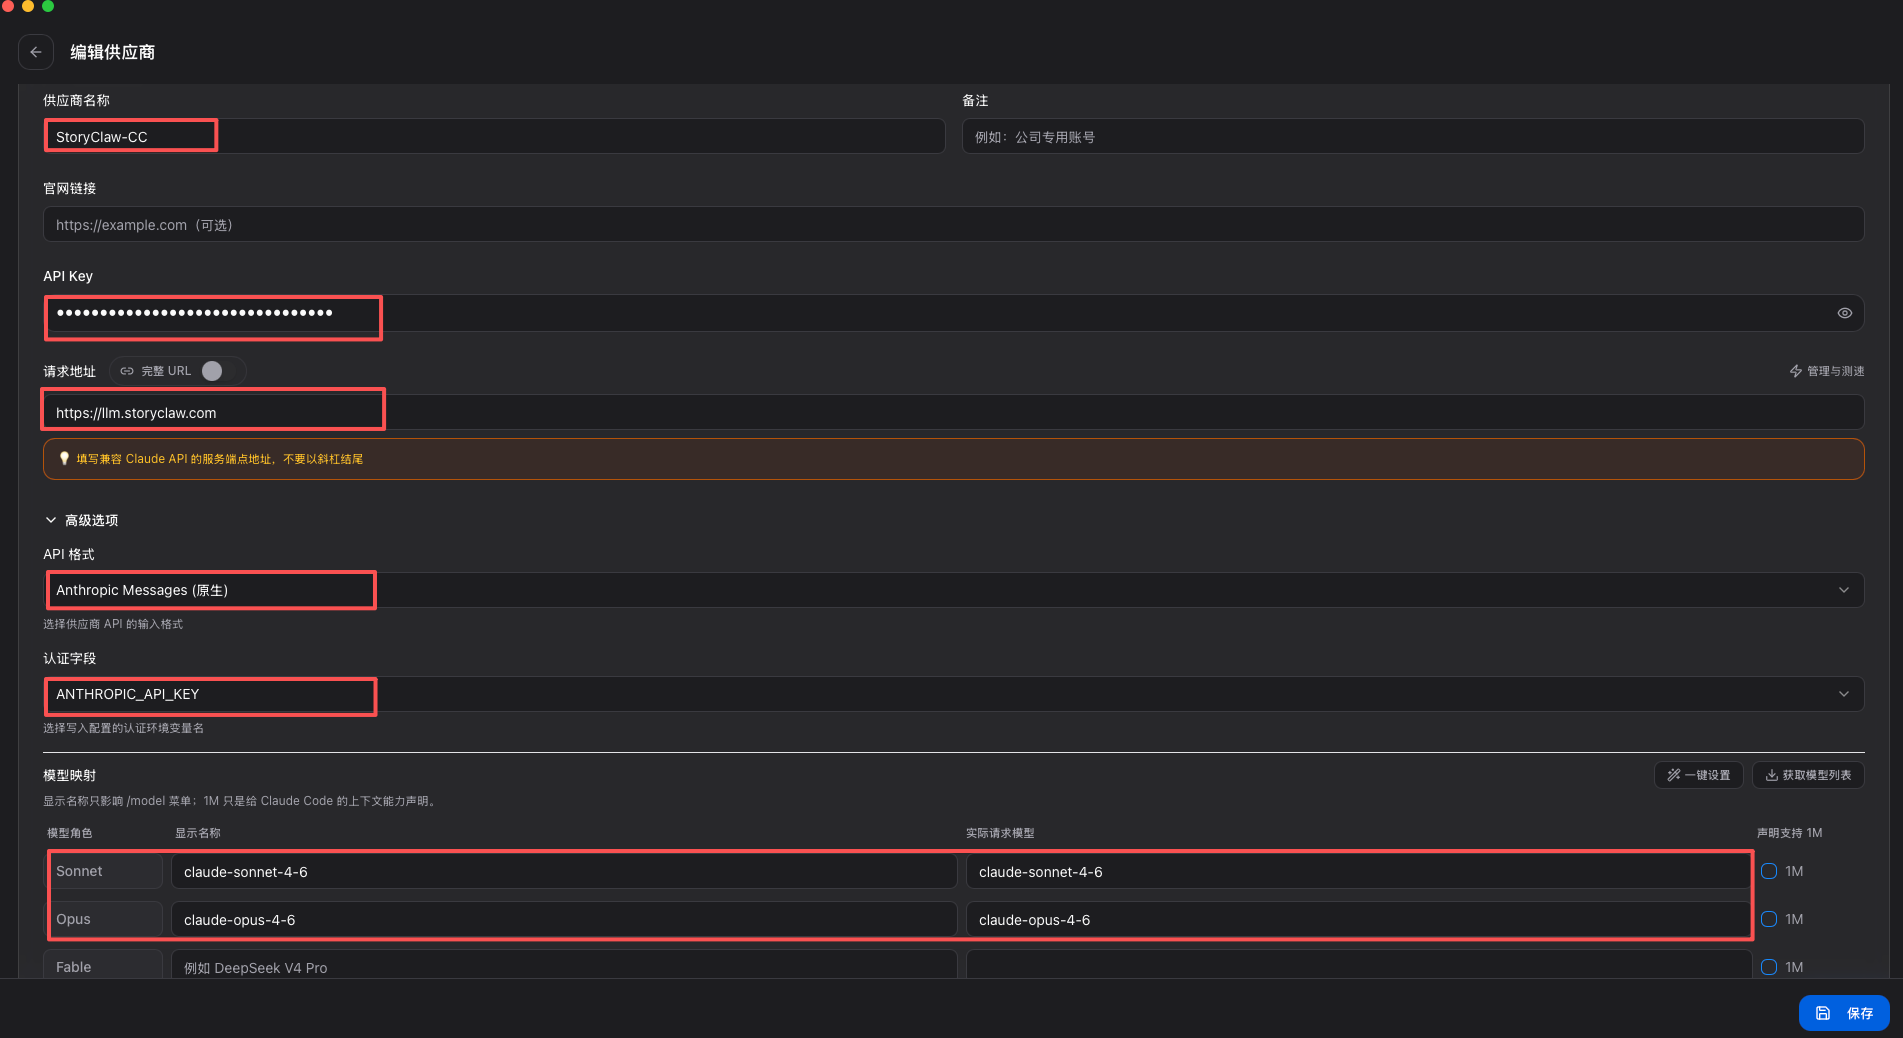
StoryClaw keeps adding support for newer model versions such as Sonnet 4.7 and Opus 4.8. When they land, just update the version numbers in the model mapping.
Save and verify
Click Save in the bottom-right corner to finish. Open a terminal, cd into any project directory, and run:
claude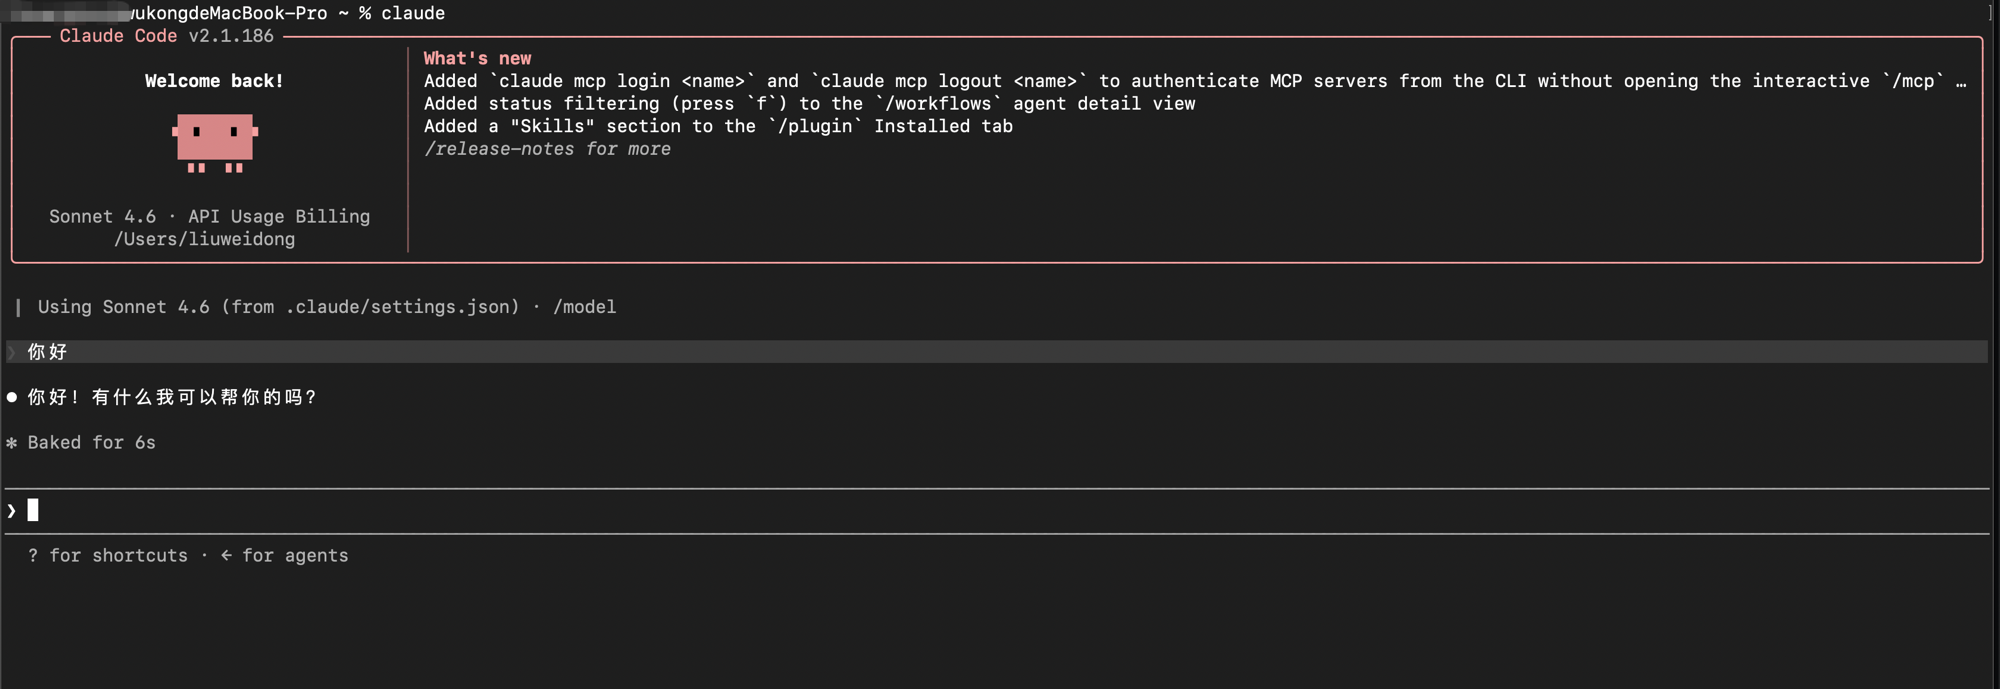
Done! Claude Code requests now route through StoryClaw, giving you access to the full Claude model lineup.
Prerequisites
- Windows 10 / 11
- A Node.js environment (version 18 or higher)
- A valid StoryClaw API key
- The CC Switch desktop app
Installation
Install Node.js
Claude Code needs a Node.js environment to run.
Option 1: winget (recommended). winget is the built-in package manager on Windows 10/11. Open PowerShell and run:
winget install OpenJS.NodeJSReopen PowerShell once the install finishes.
Option 2: Download from the website. Visit nodejs.org, download the Windows installer for the "LTS" release, and follow the wizard (the defaults are fine). Reopen PowerShell afterward.
Verify the Node.js installation:
node --version
npm --version
Seeing version numbers means the install worked. Your Node.js version should be ≥ 18.
Install Claude Code
Open PowerShell as an administrator (right-click the Start button → "Terminal (Admin)") and run:
npm install -g @anthropic-ai/claude-codeIf you get "cannot be loaded because running scripts is disabled on this system," first run Set-ExecutionPolicy -Scope CurrentUser RemoteSigned, then install again.
Verify the installation:
claude --versionSeeing a version number means Claude Code installed correctly.
Get your StoryClaw API key
Log in to the StoryClaw console, create and copy a key on the API Keys page — you'll need it for the CC Switch configuration below.
Configure with CC Switch
Once Claude Code is installed, use the CC Switch desktop app to switch it over to StoryClaw with one click. The CC Switch interface is identical across platforms.
Haven't installed CC Switch yet? Install CC Switch first, then follow the configuration steps below.
Add StoryClaw as a provider
Launch CC Switch, click the Claude Code tab at the top, then click the + button in the top-right corner.
In the "Add New Provider" dialog, click Custom Configuration, then click Add.
Edit the configuration details
Once added, find the new entry in the list and click the edit icon (pencil) on its right to open the "Edit Provider" page. Fill in the fields as follows:
| Field | Value |
|---|---|
| Provider Name | Anything you like, e.g. StoryClaw-CC |
| API Key | Your StoryClaw API key |
| Request URL | https://llm.storyclaw.com |
| API Format | Anthropic Messages (native) |
| Auth Field | ANTHROPIC_API_KEY |
Model mapping. Expand "Model Mapping" and set the actual request models for Sonnet and Opus as follows:
| Model Role | Display Name | Actual Request Model |
|---|---|---|
| Sonnet | claude-sonnet-4-6 | claude-sonnet-4-6 |
| Opus | claude-opus-4-6 | claude-opus-4-6 |
StoryClaw keeps adding support for newer model versions such as Sonnet 4.7 and Opus 4.8. When they land, just update the version numbers in the model mapping.
Save and verify
Click Save in the bottom-right corner to finish. Open PowerShell, cd into any project directory, and run:
claude
Done! Claude Code requests now route through StoryClaw, giving you access to the full Claude model lineup.
Prerequisites
- Linux (Ubuntu/Debian, Fedora/RHEL, or another mainstream distribution)
- A Node.js environment (version 18 or higher)
- A valid StoryClaw API key
- The CC Switch desktop app
Installation
Install Node.js
Claude Code needs a Node.js environment to run.
Option 1: nvm (recommended). nvm avoids sudo permission issues and is recommended for most users:
# Install nvm
curl -o- https://raw.githubusercontent.com/nvm-sh/nvm/v0.39.7/install.sh | bash

# Reload environment variables (or reopen your terminal)
source ~/.bashrc   # zsh users: source ~/.zshrc

# Install the LTS version of Node.js
nvm install --lts
Option 2: System package manager (Ubuntu/Debian).
curl -fsSL https://deb.nodesource.com/setup_lts.x | sudo -E bash -
sudo apt-get install -y nodejs
Verify the Node.js installation:
node --version
npm --version
Seeing version numbers means the install worked. Your Node.js version should be ≥ 18.
Install Claude Code
npm install -g @anthropic-ai/claude-codeIf you're using a system Node.js (not nvm) and hit permission issues, use sudo npm install -g @anthropic-ai/claude-code instead.
Verify the installation:
claude --versionSeeing a version number means Claude Code installed correctly.
Get your StoryClaw API key
Log in to the StoryClaw console, create and copy a key on the API Keys page — you'll need it for the CC Switch configuration below.
Configure with CC Switch
Once Claude Code is installed, use the CC Switch desktop app to switch it over to StoryClaw with one click. The CC Switch interface is identical across platforms.
Haven't installed CC Switch yet? Install CC Switch first, then follow the configuration steps below.
Add StoryClaw as a provider
Launch CC Switch, click the Claude Code tab at the top, then click the + button in the top-right corner.
In the "Add New Provider" dialog, click Custom Configuration, then click Add.
Edit the configuration details
Once added, find the new entry in the list and click the edit icon (pencil) on its right to open the "Edit Provider" page. Fill in the fields as follows:
| Field | Value |
|---|---|
| Provider Name | Anything you like, e.g. StoryClaw-CC |
| API Key | Your StoryClaw API key |
| Request URL | https://llm.storyclaw.com |
| API Format | Anthropic Messages (native) |
| Auth Field | ANTHROPIC_API_KEY |
Model mapping. Expand "Model Mapping" and set the actual request models for Sonnet and Opus as follows:
| Model Role | Display Name | Actual Request Model |
|---|---|---|
| Sonnet | claude-sonnet-4-6 | claude-sonnet-4-6 |
| Opus | claude-opus-4-6 | claude-opus-4-6 |
StoryClaw keeps adding support for newer model versions such as Sonnet 4.7 and Opus 4.8. When they land, just update the version numbers in the model mapping.
Save and verify
Click Save in the bottom-right corner to finish. Open a terminal, cd into any project directory, and run:
claude
Done! Claude Code requests now route through StoryClaw, giving you access to the full Claude model lineup.