
Codex
Connect Codex to StoryClaw through CC Switch and use the full Claude model lineup on macOS, Windows, or Linux.
Connect Codex to StoryClaw through CC Switch and use the full Claude model lineup. Pick your platform below and follow the steps.
Prerequisites
- macOS 10.15 (Catalina) or later
- A Node.js environment (version 18 or higher)
- A valid StoryClaw API key
- The CC Switch desktop app (see the CC Switch guide)
Install Node.js
Codex CLI requires a Node.js environment to run.
Option 1: Homebrew (recommended)
If you already have Homebrew, installing Node.js with it is the easiest path:
# Update Homebrew
brew update

# Install Node.js
brew install node
If you don't have Homebrew yet, visit brew.sh or run the install command in your terminal.
Option 2: Download from the website
Go to nodejs.org, click the LTS version to download the installer, and complete the setup with the wizard (the default settings are fine).
Verify the installation
node --version
npm --version
If a version number is printed, Node.js is installed correctly. The Node.js version should be 18 or higher.
Install Codex CLI
npm install -g @openai/codexIf you hit a permission denied error, use sudo npm install -g @openai/codex.
Verify the installation
codex -VIf a version number is printed, the installation is fine. If the command is not found, reopen your terminal window and try again.
Get your StoryClaw API key
Log in to the StoryClaw console, then create and copy a key on the API Keys page. You'll need it during the CC Switch configuration.
Add the StoryClaw provider
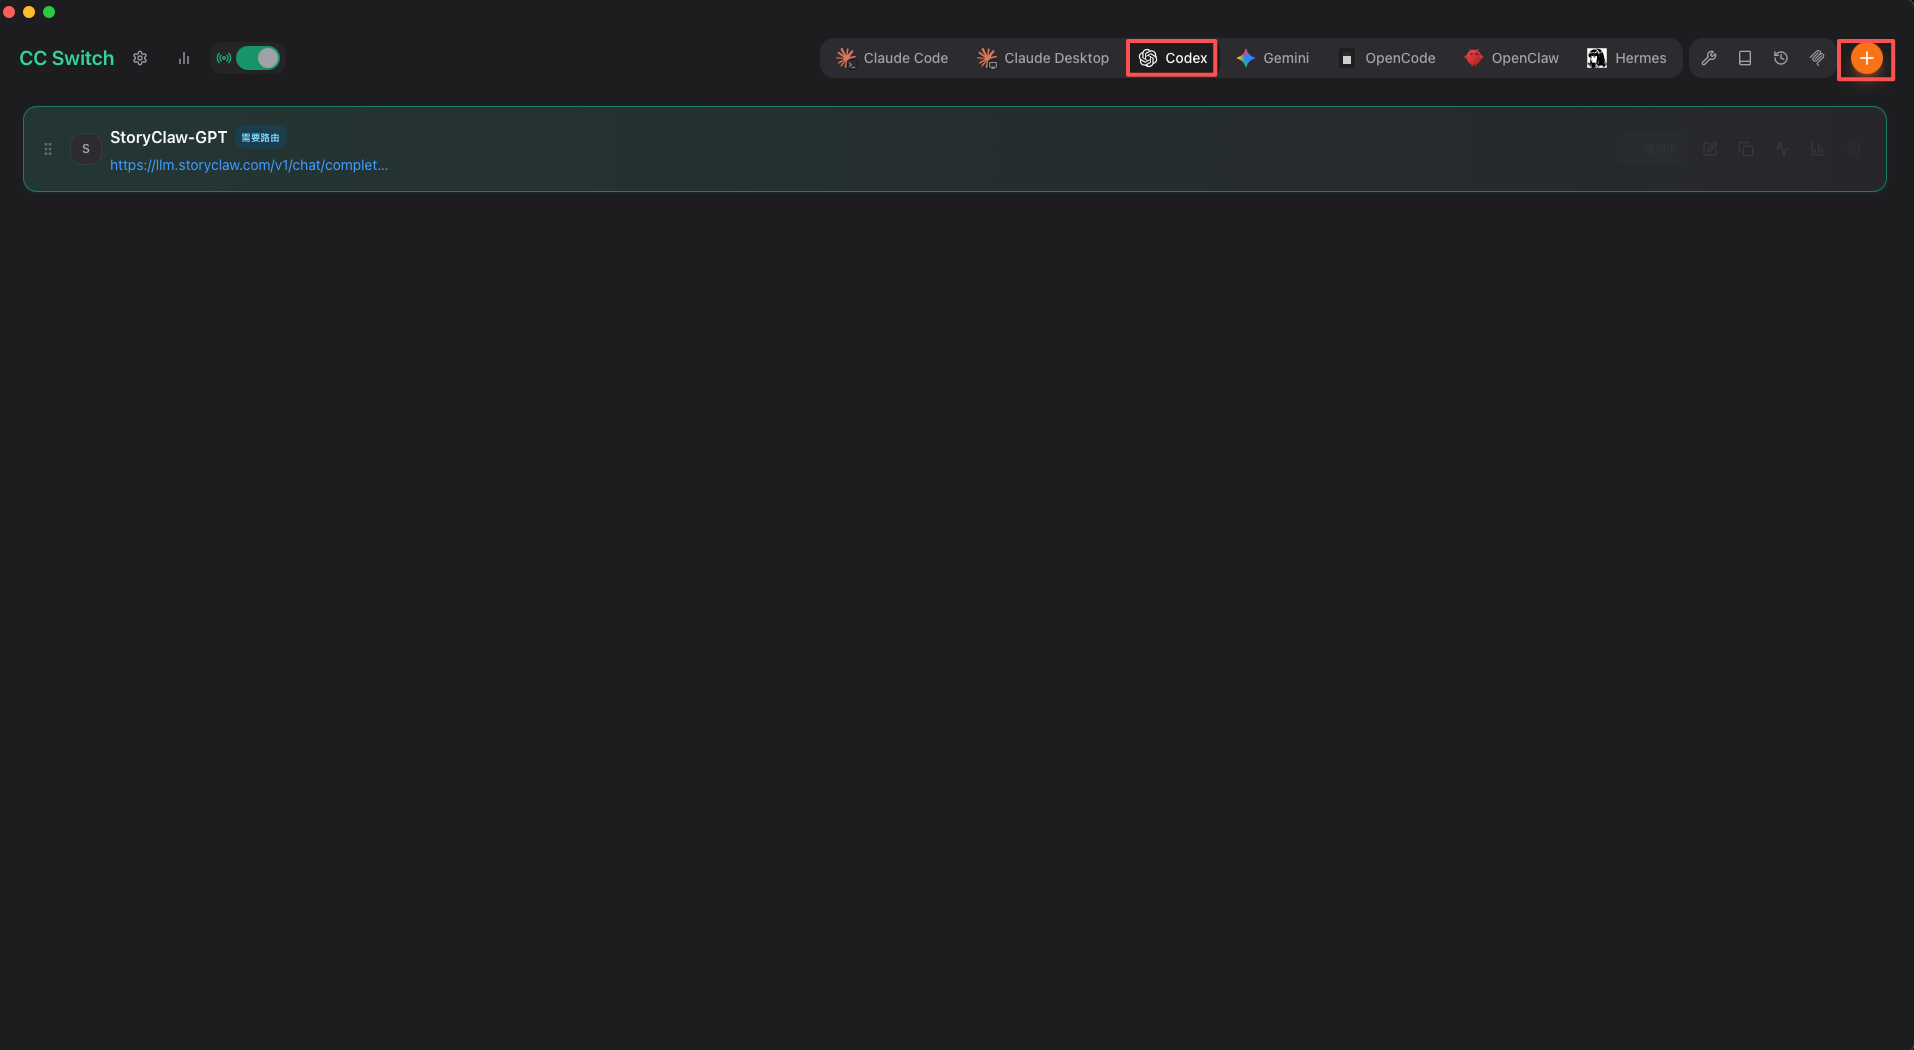
In CC Switch, switch to the Codex tab and click the + button in the top-right corner:
In the "Add new provider" dialog, click Custom configuration, fill in the form as described below, then click Add in the bottom-right corner:
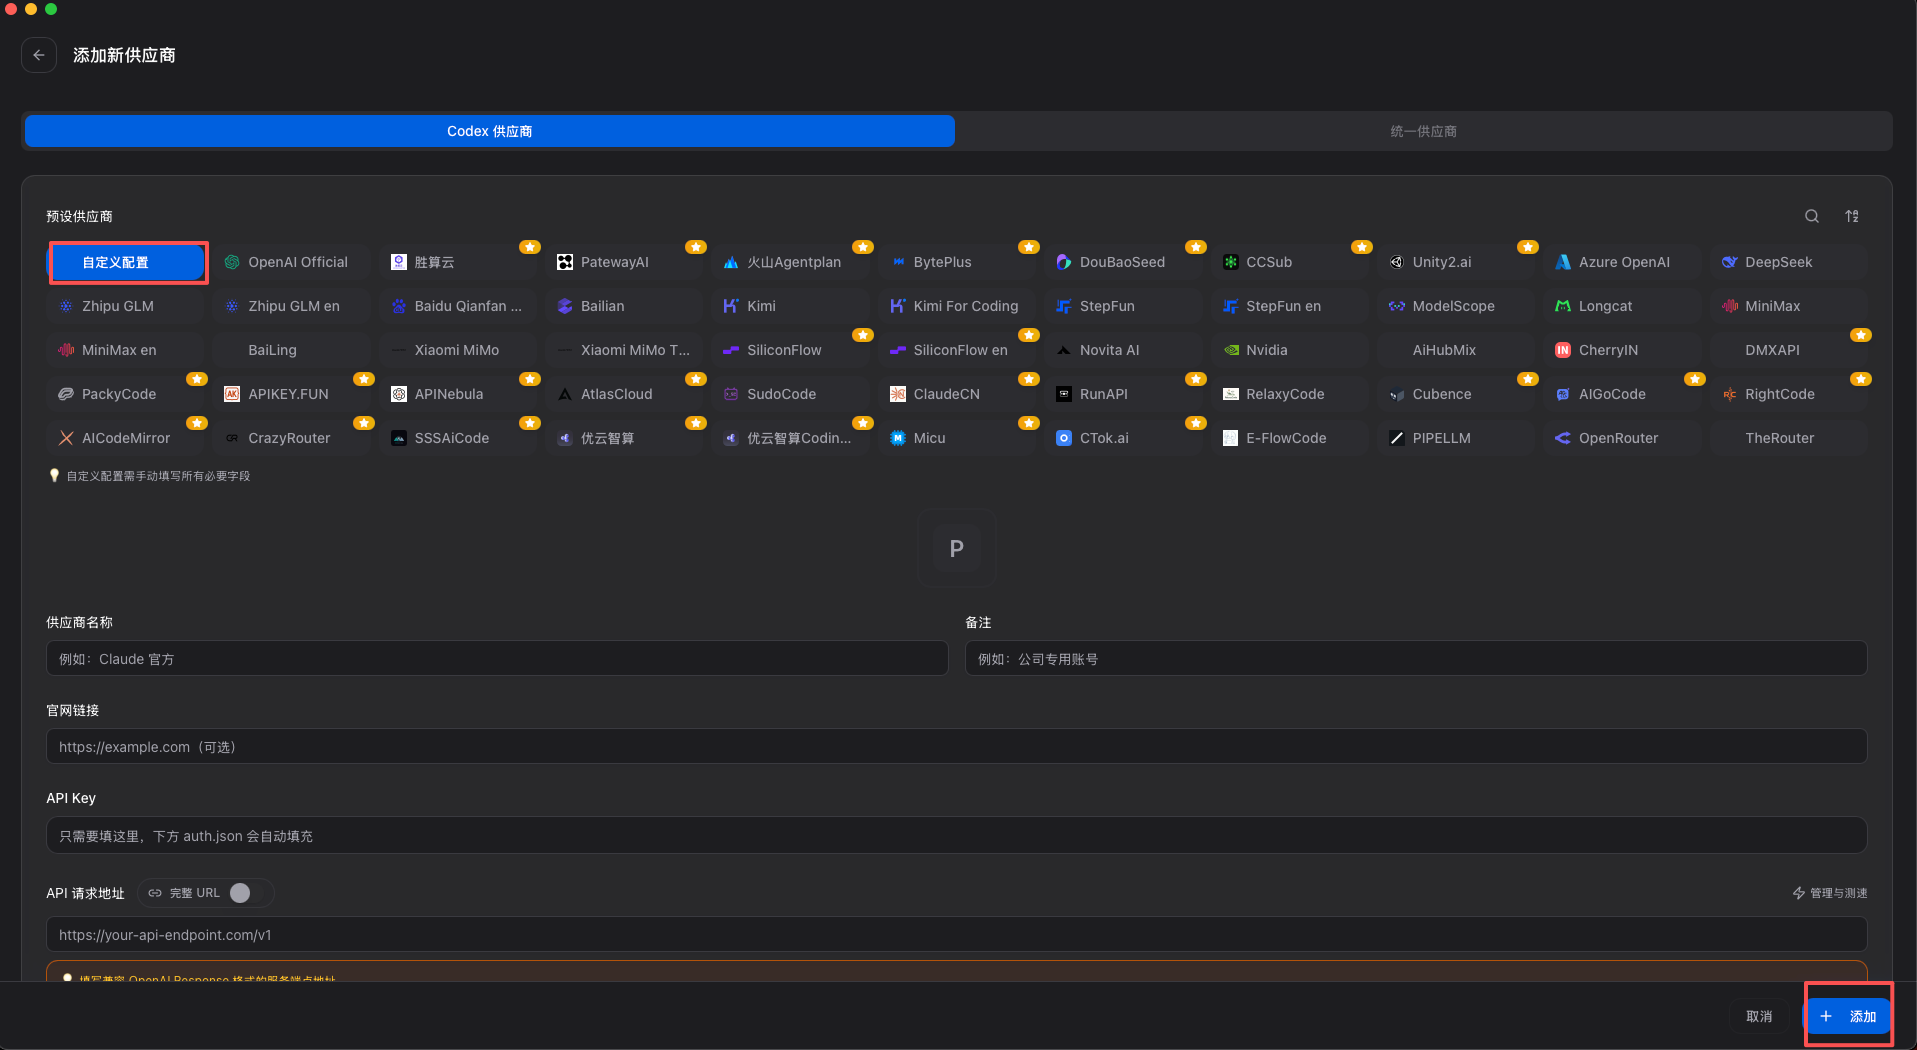
| Field | Value |
|---|---|
| Provider name | StoryClaw (any name you like) |
| API Key | Your StoryClaw API key (how to create a key) |
| API request URL | https://llm.storyclaw.com/v1/chat/completions — turn on the Full URL switch |
The Full URL switch must be turned on — the router uses this URL directly and will not append any path.
Advanced options
After filling in the basic configuration, expand Advanced options at the bottom of the form and set the key options described below:
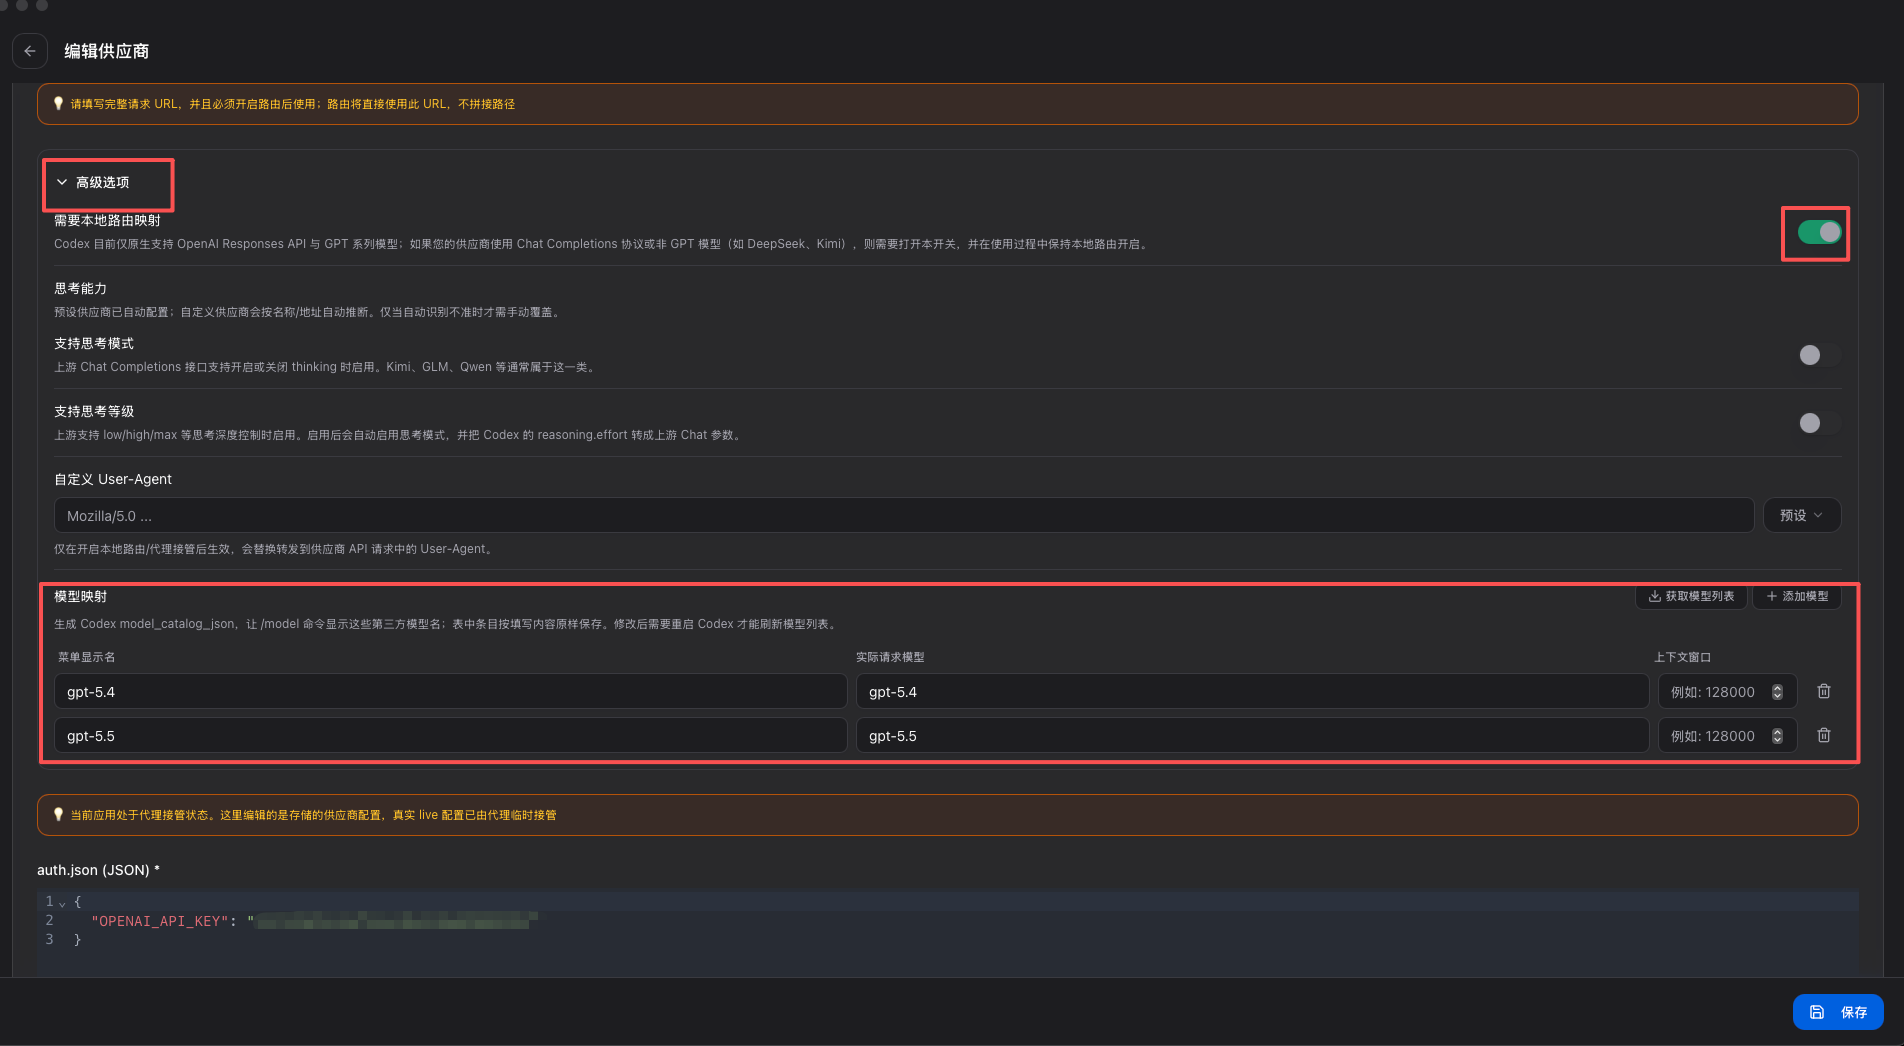
| Option | Details |
|---|---|
| Requires local route mapping | Must be enabled. StoryClaw uses the Chat Completions protocol, while Codex natively supports only the OpenAI Responses API. You must enable this switch and keep the local router running. |
| Reasoning effort support | Optional. When enabled, Codex's reasoning.effort (low / medium / high) is automatically converted to the upstream Chat parameters — useful when you need to control the reasoning budget. |
| Model mapping | Optional. Codex natively recognizes only GPT-family model names. Once you add a mapping here, CC Switch forwards the GPT model name Codex selects to StoryClaw, which then handles model routing. Click Fetch model list to pull the models StoryClaw supports automatically, or click + Add model to enter one manually. Restart Codex after changes to refresh the list. |
When you're done, click Save.
Enable Codex routing
Click the Settings gear icon in the top-left corner of CC Switch:
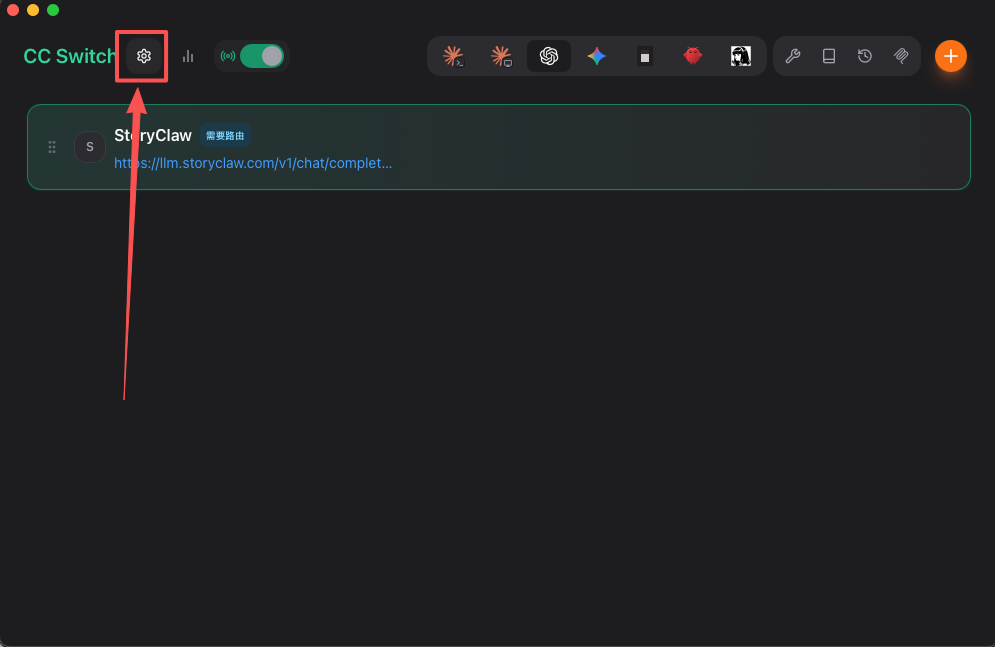
Click the Routing tab, turn on the master routing switch, then enable Codex individually in the "Routing enabled" section:
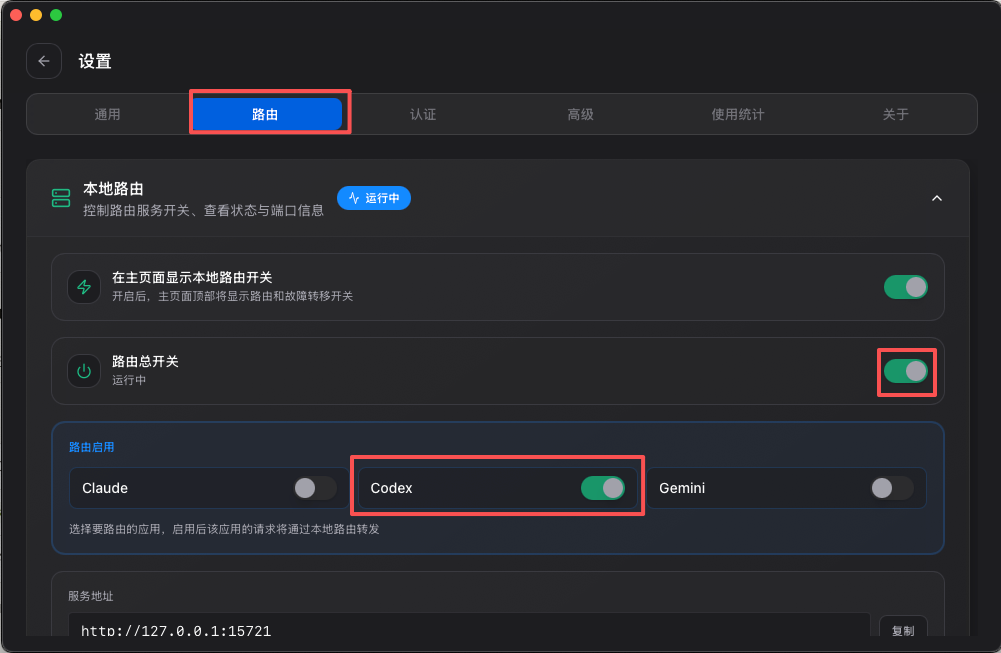
Once enabled, the routing status shows "Running", and all Codex requests are automatically forwarded to StoryClaw through the local router (127.0.0.1:15721).
Launch Codex and test a chat
Start it by typing codex in your terminal:
codex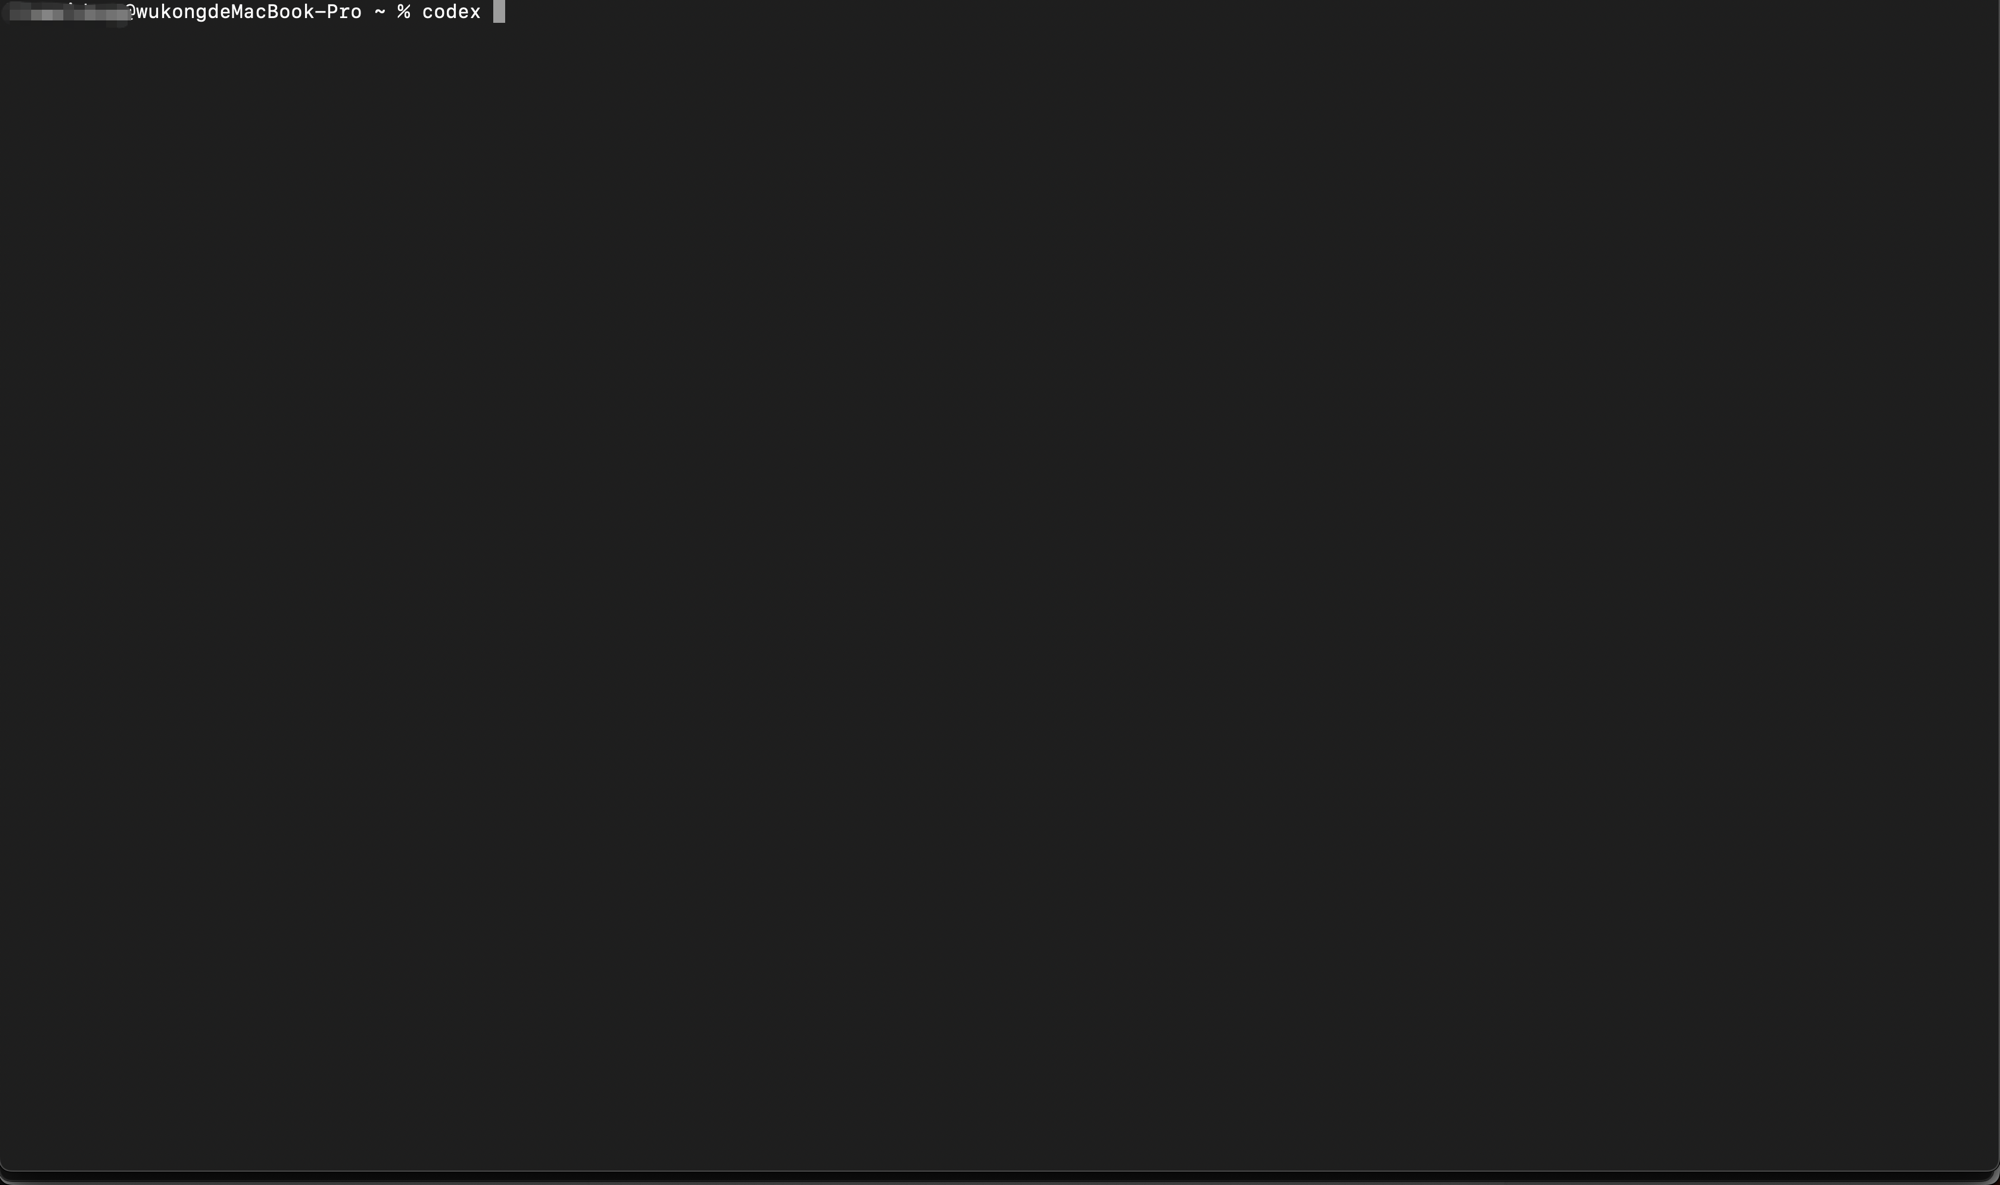
Once Codex starts, type anything (for example, "Hello") in the input box. A normal reply from the model means the connection is working:
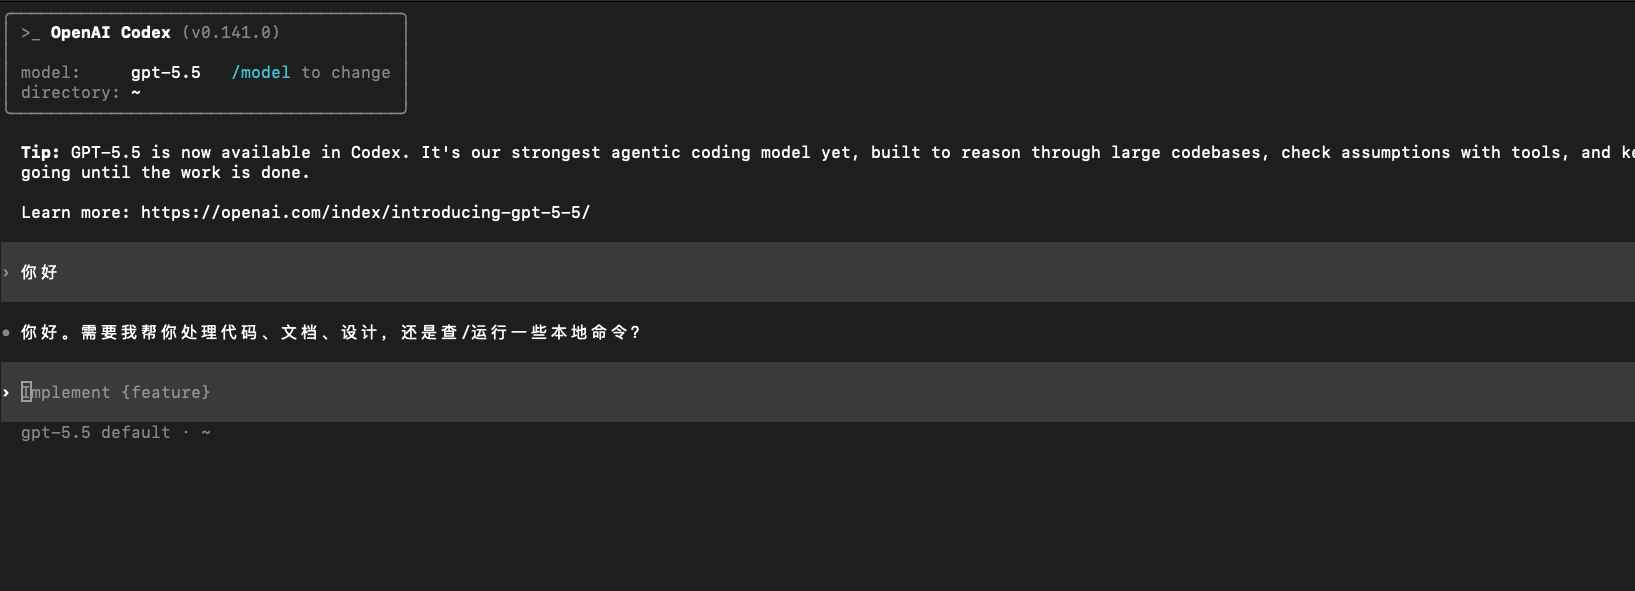
The launch screen shows the name of the model currently in use. Once you've confirmed the model is what you expect, you're ready to use Codex.
Prerequisites
- Windows 10 / 11
- A Node.js environment (version 18 or higher)
- A valid StoryClaw API key
- The CC Switch desktop app (see the CC Switch guide)
Install Node.js
Codex CLI requires a Node.js environment to run.
Option 1: winget (recommended)
winget is the built-in package manager on Windows 10/11. Open PowerShell and run:
winget install OpenJS.NodeJSReopen PowerShell after the installation completes.
Option 2: Download from the website
Go to nodejs.org, click the LTS version to download the Windows installer, and complete the setup with the wizard (the default settings are fine). Reopen PowerShell afterward.
Verify the installation
node --version
npm --version
If a version number is printed, Node.js is installed correctly. The Node.js version should be 18 or higher.
Install Codex CLI
Open PowerShell as an administrator (right-click the Start button → Terminal (Admin)) and run:
npm install -g @openai/codexIf you see "cannot be loaded because running scripts is disabled on this system", run Set-ExecutionPolicy -Scope CurrentUser RemoteSigned first, then reinstall.
Verify the installation
codex -VIf a version number is printed, Codex CLI is installed correctly.
Get your StoryClaw API key
Log in to the StoryClaw console, then create and copy a key on the API Keys page. You'll need it during the CC Switch configuration.
Add the StoryClaw provider
In CC Switch, switch to the Codex tab and click the + button in the top-right corner:
In the "Add new provider" dialog, click Custom configuration, fill in the form as described below, then click Add in the bottom-right corner:
| Field | Value |
|---|---|
| Provider name | StoryClaw (any name you like) |
| API Key | Your StoryClaw API key (how to create a key) |
| API request URL | https://llm.storyclaw.com/v1/chat/completions — turn on the Full URL switch |
The Full URL switch must be turned on — the router uses this URL directly and will not append any path.
Advanced options
After filling in the basic configuration, expand Advanced options at the bottom of the form and set the key options described below:
| Option | Details |
|---|---|
| Requires local route mapping | Must be enabled. StoryClaw uses the Chat Completions protocol, while Codex natively supports only the OpenAI Responses API. You must enable this switch and keep the local router running. |
| Reasoning effort support | Optional. When enabled, Codex's reasoning.effort (low / medium / high) is automatically converted to the upstream Chat parameters — useful when you need to control the reasoning budget. |
| Model mapping | Optional. Codex natively recognizes only GPT-family model names. Once you add a mapping here, CC Switch forwards the GPT model name Codex selects to StoryClaw, which then handles model routing. Click Fetch model list to pull the models StoryClaw supports automatically, or click + Add model to enter one manually. Restart Codex after changes to refresh the list. |
When you're done, click Save.
Enable Codex routing
Click the Settings gear icon in the top-left corner of CC Switch:
Click the Routing tab, turn on the master routing switch, then enable Codex individually:
Once enabled, the routing status shows "Running", and all Codex requests are automatically forwarded to StoryClaw through the local router (127.0.0.1:15721).
Launch Codex and test a chat
Open PowerShell or Windows Terminal and type codex to start:
codex
Once Codex starts, type "Hello". A normal reply from the model means the connection is working:
The launch screen shows the name of the model currently in use. Once you've confirmed the model is what you expect, you're ready to use Codex.
Prerequisites
- Linux (Ubuntu/Debian, Fedora/RHEL, or another mainstream distribution)
- A Node.js environment (version 18 or higher)
- A valid StoryClaw API key
- The CC Switch desktop app (see the CC Switch guide)
Install Node.js
Codex CLI requires a Node.js environment to run.
Option 1: nvm (recommended)
nvm avoids sudo permission issues and is recommended for most users:
# Install nvm
curl -o- https://raw.githubusercontent.com/nvm-sh/nvm/v0.39.7/install.sh | bash

# Reload environment variables (or reopen your terminal)
source ~/.bashrc   # zsh users: source ~/.zshrc instead

# Install the LTS version of Node.js
nvm install --lts
Option 2: System package manager (Ubuntu/Debian)
curl -fsSL https://deb.nodesource.com/setup_lts.x | sudo -E bash -
sudo apt-get install -y nodejs
Verify the installation
node --version
npm --version
If a version number is printed, Node.js is installed correctly. The Node.js version should be 18 or higher.
Install Codex CLI
npm install -g @openai/codexIf you're using the system Node.js (not nvm) and hit permission issues, use sudo npm install -g @openai/codex instead.
Verify the installation
codex -VIf a version number is printed, Codex CLI is installed correctly.
Get your StoryClaw API key
Log in to the StoryClaw console, then create and copy a key on the API Keys page. You'll need it during the CC Switch configuration.
Add the StoryClaw provider
In CC Switch, switch to the Codex tab and click the + button in the top-right corner:
In the "Add new provider" dialog, click Custom configuration, fill in the form as described below, then click Add in the bottom-right corner:
| Field | Value |
|---|---|
| Provider name | StoryClaw (any name you like) |
| API Key | Your StoryClaw API key (how to create a key) |
| API request URL | https://llm.storyclaw.com/v1/chat/completions — turn on the Full URL switch |
The Full URL switch must be turned on — the router uses this URL directly and will not append any path.
Advanced options
After filling in the basic configuration, expand Advanced options at the bottom of the form and set the key options described below:
| Option | Details |
|---|---|
| Requires local route mapping | Must be enabled. StoryClaw uses the Chat Completions protocol, while Codex natively supports only the OpenAI Responses API. You must enable this switch and keep the local router running. |
| Reasoning effort support | Optional. When enabled, Codex's reasoning.effort (low / medium / high) is automatically converted to the upstream Chat parameters — useful when you need to control the reasoning budget. |
| Model mapping | Optional. Codex natively recognizes only GPT-family model names. Once you add a mapping here, CC Switch forwards the GPT model name Codex selects to StoryClaw, which then handles model routing. Click Fetch model list to pull the models StoryClaw supports automatically, or click + Add model to enter one manually. Restart Codex after changes to refresh the list. |
When you're done, click Save.
Enable Codex routing
Click the Settings gear icon in the top-left corner of CC Switch:
Click the Routing tab, turn on the master routing switch, then enable Codex individually:
Once enabled, the routing status shows "Running", and all Codex requests are automatically forwarded to StoryClaw through the local router (127.0.0.1:15721).
Launch Codex and test a chat
Start it by typing codex in your terminal:
codex
Once Codex starts, type "Hello". A normal reply from the model means the connection is working:
The launch screen shows the name of the model currently in use. Once you've confirmed the model is what you expect, you're ready to use Codex.