
ClawBot Interface Guide
Learn ClawBot's three-zone chat layout and each section of the right-side Agent Details panel — Info Card, Workspace, Growth Center, Skills, and Security.
Overview
This guide covers ClawBot's three-zone interface layout and explains each section in the right-side "Agent Details" panel.
Three-Zone Layout
The ClawBot interface is divided into three functional zones that work together seamlessly.
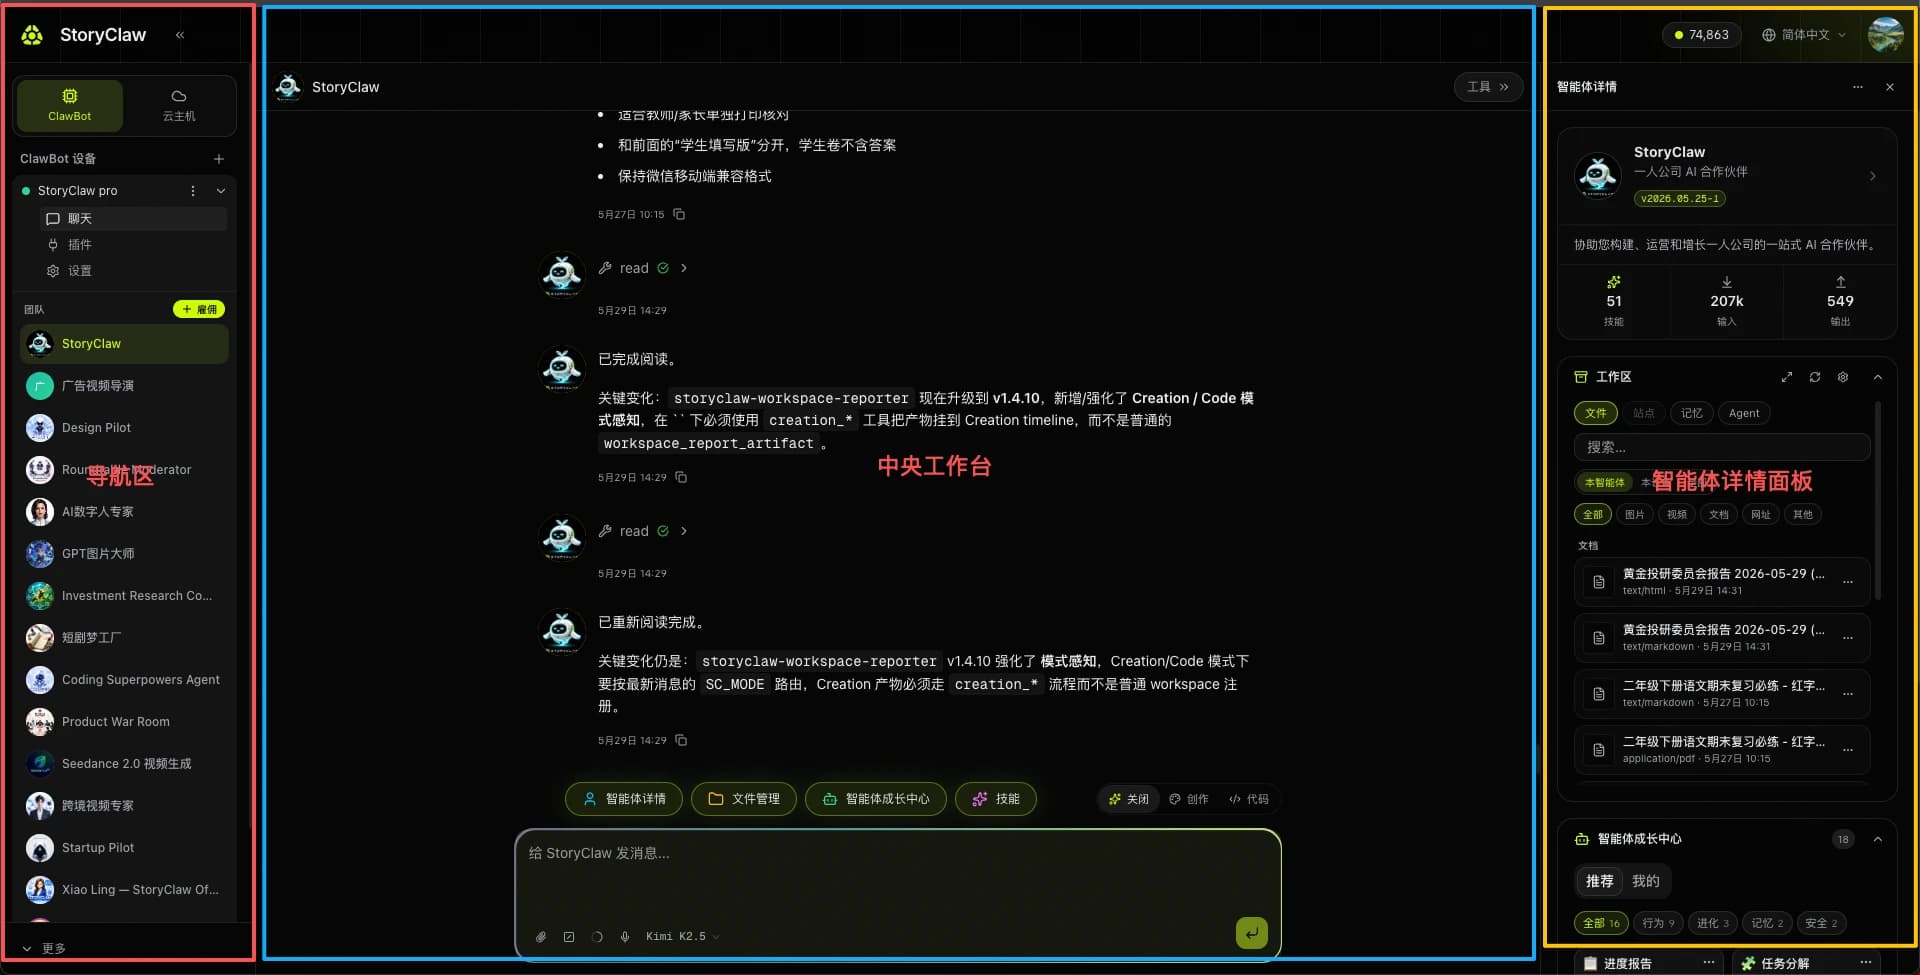
- ① Left Sidebar — ClawBot device navigation and team Agent list. Click to switch Agents; "+ Hire" to add from the marketplace.
- ② Central Workbench — Main chat area with message history, tool execution logs, bottom shortcut bar, and input box.
- ③ Agent Details Panel — Control hub for Agent state and capabilities. Contains five sections: Info Card, Workspace, Growth Center, Skills, Security.
Agent Details Panel
Click "Agent Details" at the top or the bottom shortcut bar to open the right panel. Five sections are stacked top to bottom.
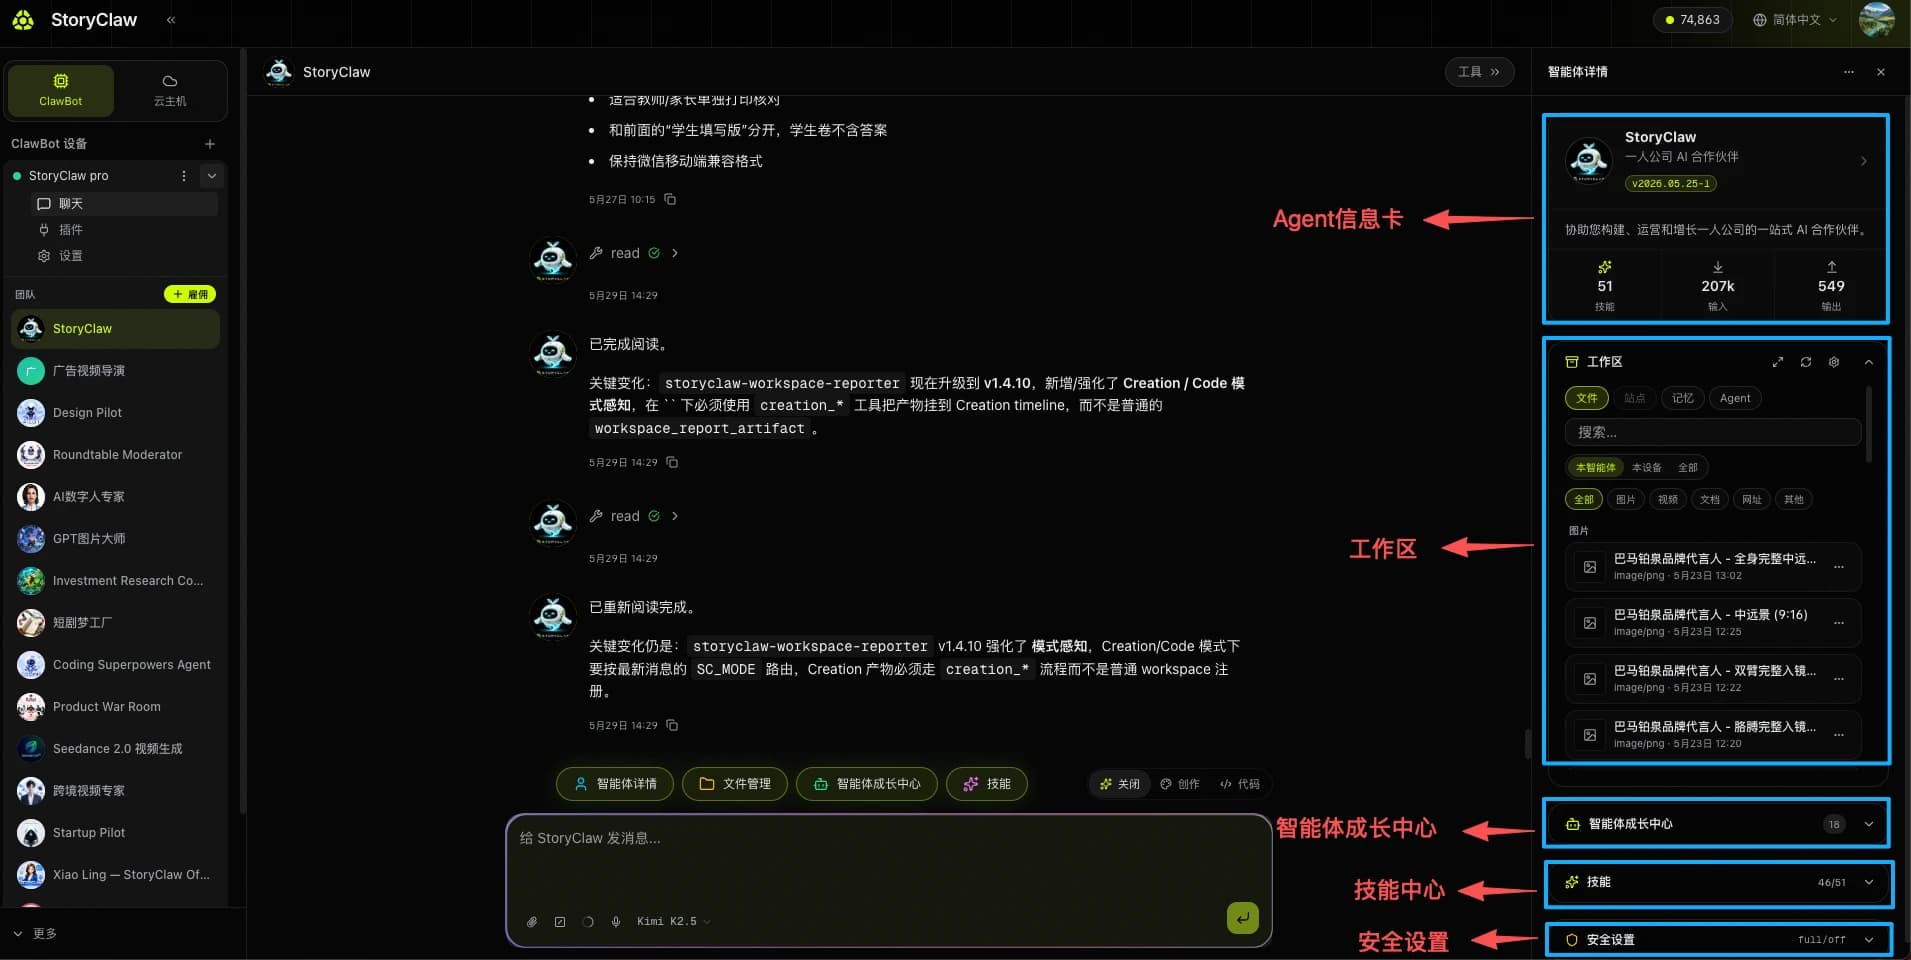
① Agent Info Card
The top card shows the current Agent's basic profile so you always know which member you're working with.
| Field | Description |
|---|---|
| Name & Role Tag | The Agent's name and role, e.g. "Official Customer Support" |
| Version | Format vDate-index, reflects the last update to this Agent's configuration |
| Skills Count | Total installed and ready skill plugins |
| Input / Output | Cumulative tokens consumed — useful for monitoring per-Agent resource usage |
② Workspace
The Workspace is the Agent's asset archive — it stores outputs, memories, and version snapshots. Four tabs organize different asset types: Files, Sites, Memory, Agent.
Prerequisite
The Workspace Reporter skill must be installed. If missing, a prompt appears — click to install in one step. Once installed, tell the Agent: "Please register the output to the Workspace." The Agent will invoke Workspace Reporter to log the result. Going forward, all outputs are archived automatically — no need to remind it again.
Files Tab
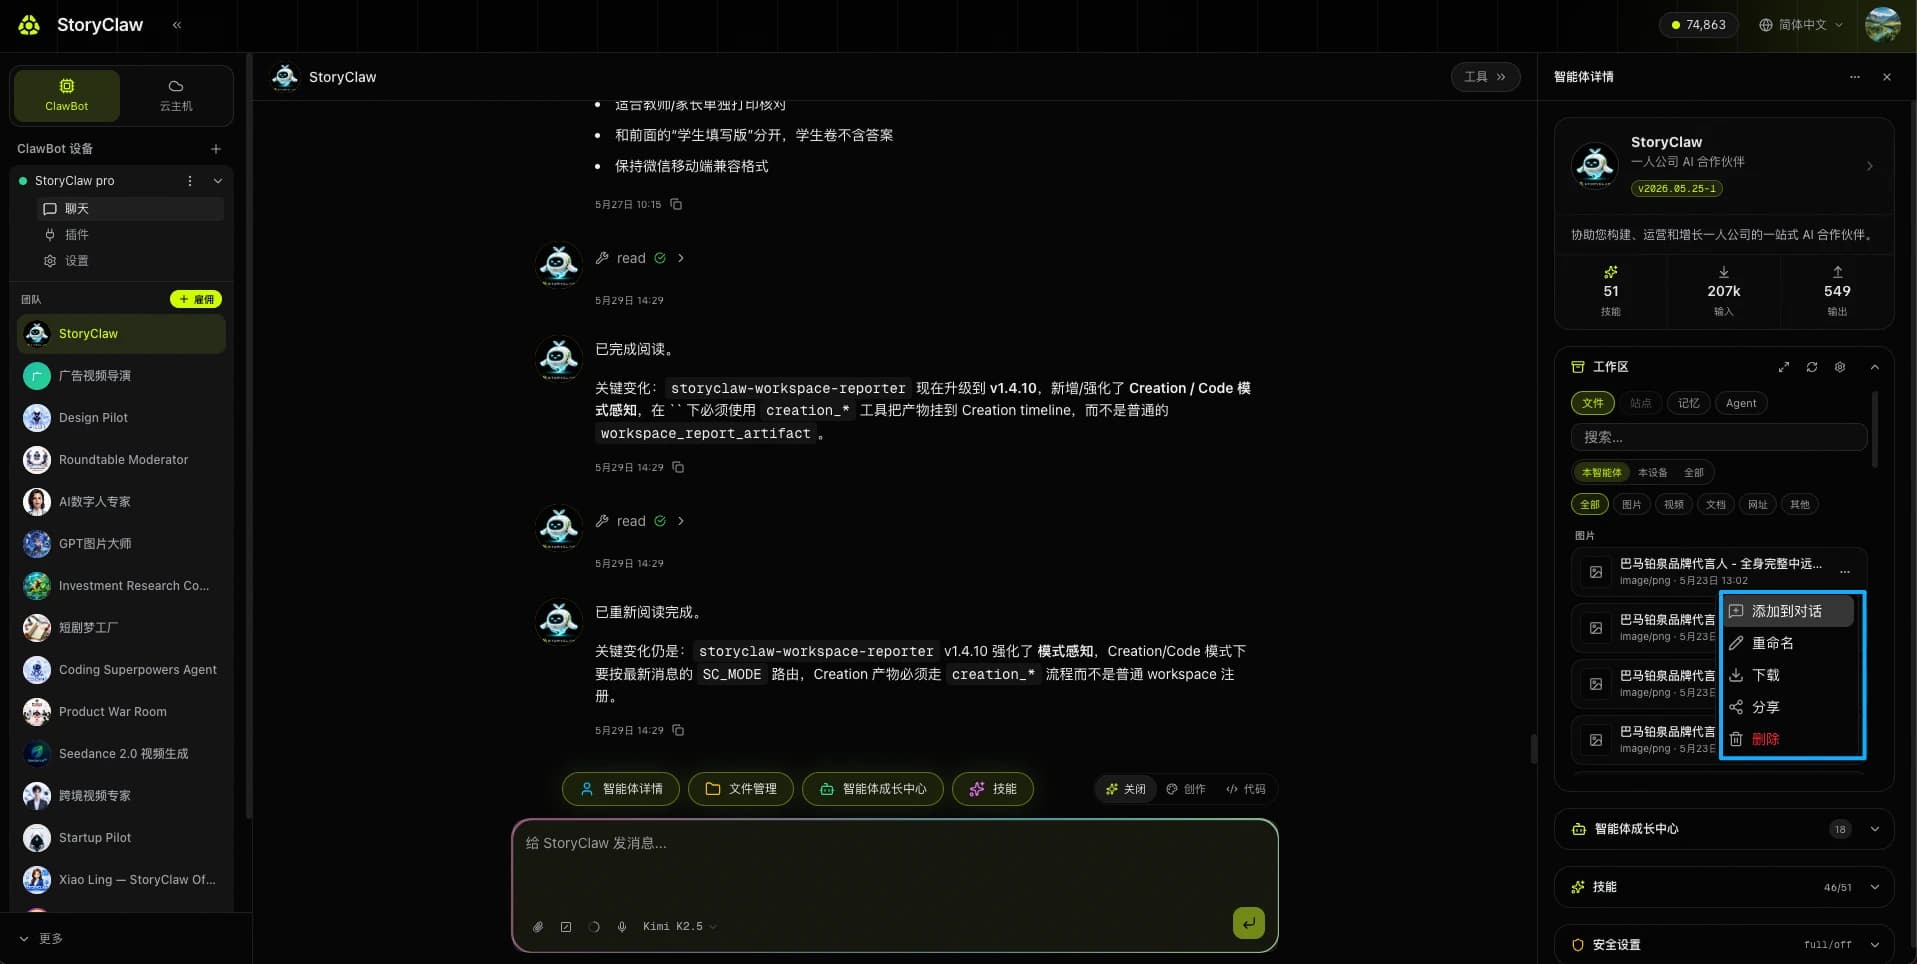
Stores images, videos, documents, and other outputs generated by the Agent. Filter by "All / Starred / Shared / Agent Private". Click "…" on any file to access five actions:
| Action | Description |
|---|---|
| Add to Chat | Inject the file into the current conversation context for the Agent to analyze or build on |
| Rename | Change the file's display name in the Workspace for easier organization |
| Download | Download the file to your local device |
| Share | Generate a share link with configurable access (anyone / specific people) and expiration (see below) |
| Delete | Permanently remove — this cannot be undone |
File Share
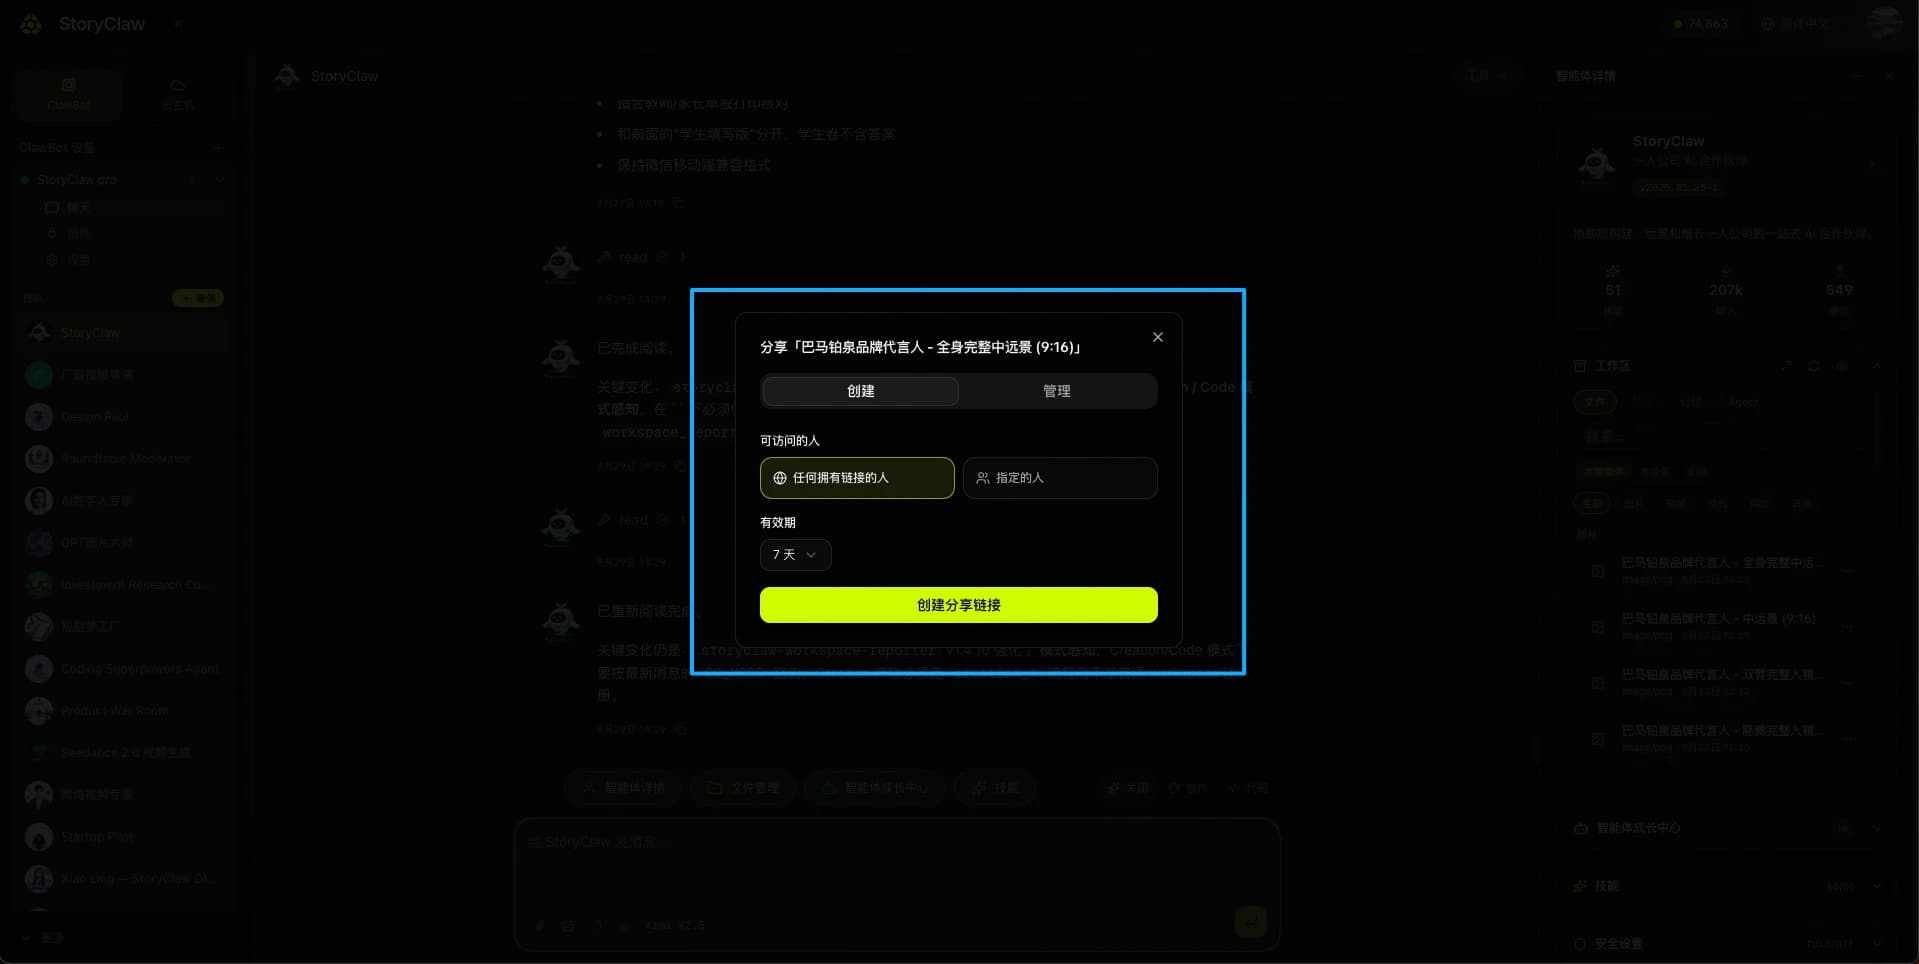
Clicking "Share" opens the share panel with flexible permission and expiration options:
| Setting | Description |
|---|---|
| Anyone with the link | Generates a public link — anyone can access without logging in |
| Specific people | Only specified accounts can access — suitable for internal team sharing |
| Expiration | Set the link's validity period. Expired links are automatically invalidated. Manage existing shares under the "Manage" tab |
Memory Tab
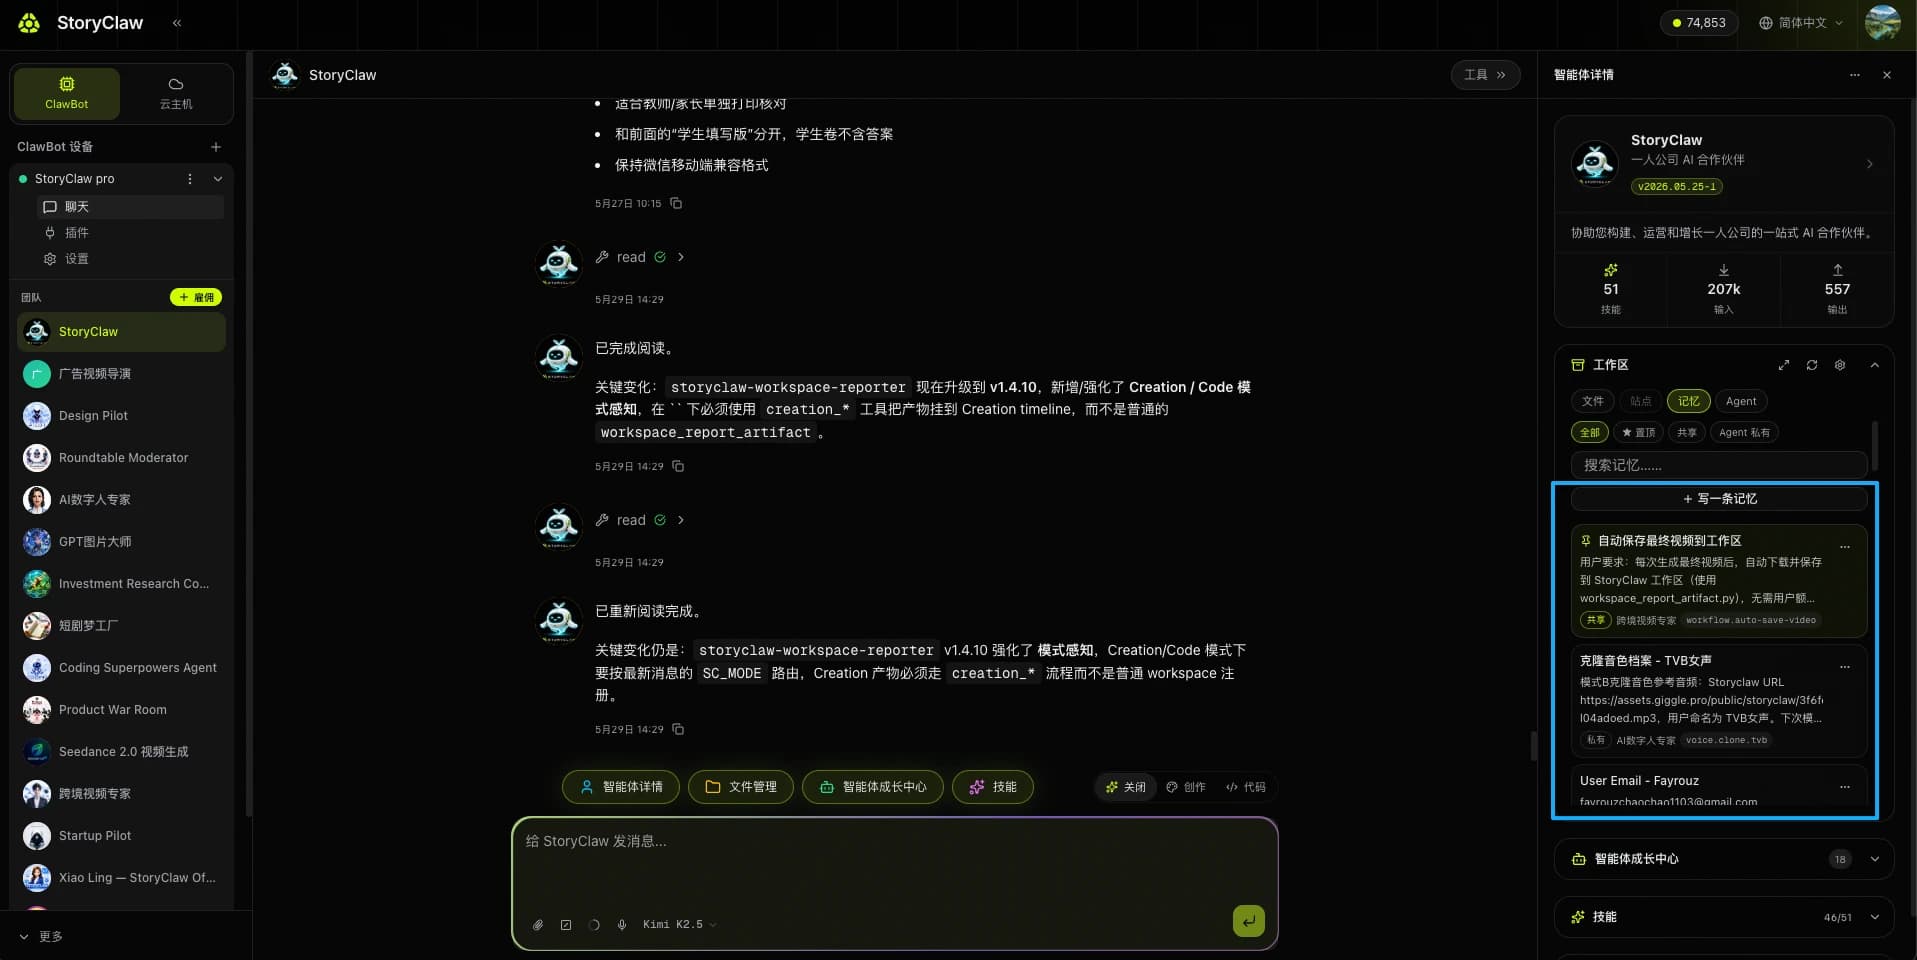
Memory is the Agent's long-term instruction store. Write rules, preferences, or working protocols into memory — the Agent follows them automatically in every conversation without reminders.
Click "+ Write a memory" to add one manually. Each memory entry contains:
| Field | Description |
|---|---|
| Access | Shared: all Agents can read it / Private: visible to this Agent only |
| Owner Agent | The Agent this memory belongs to |
| Memory Key | Title or identifier for the memory — makes it easy to search and manage |
Agent Archive Tab
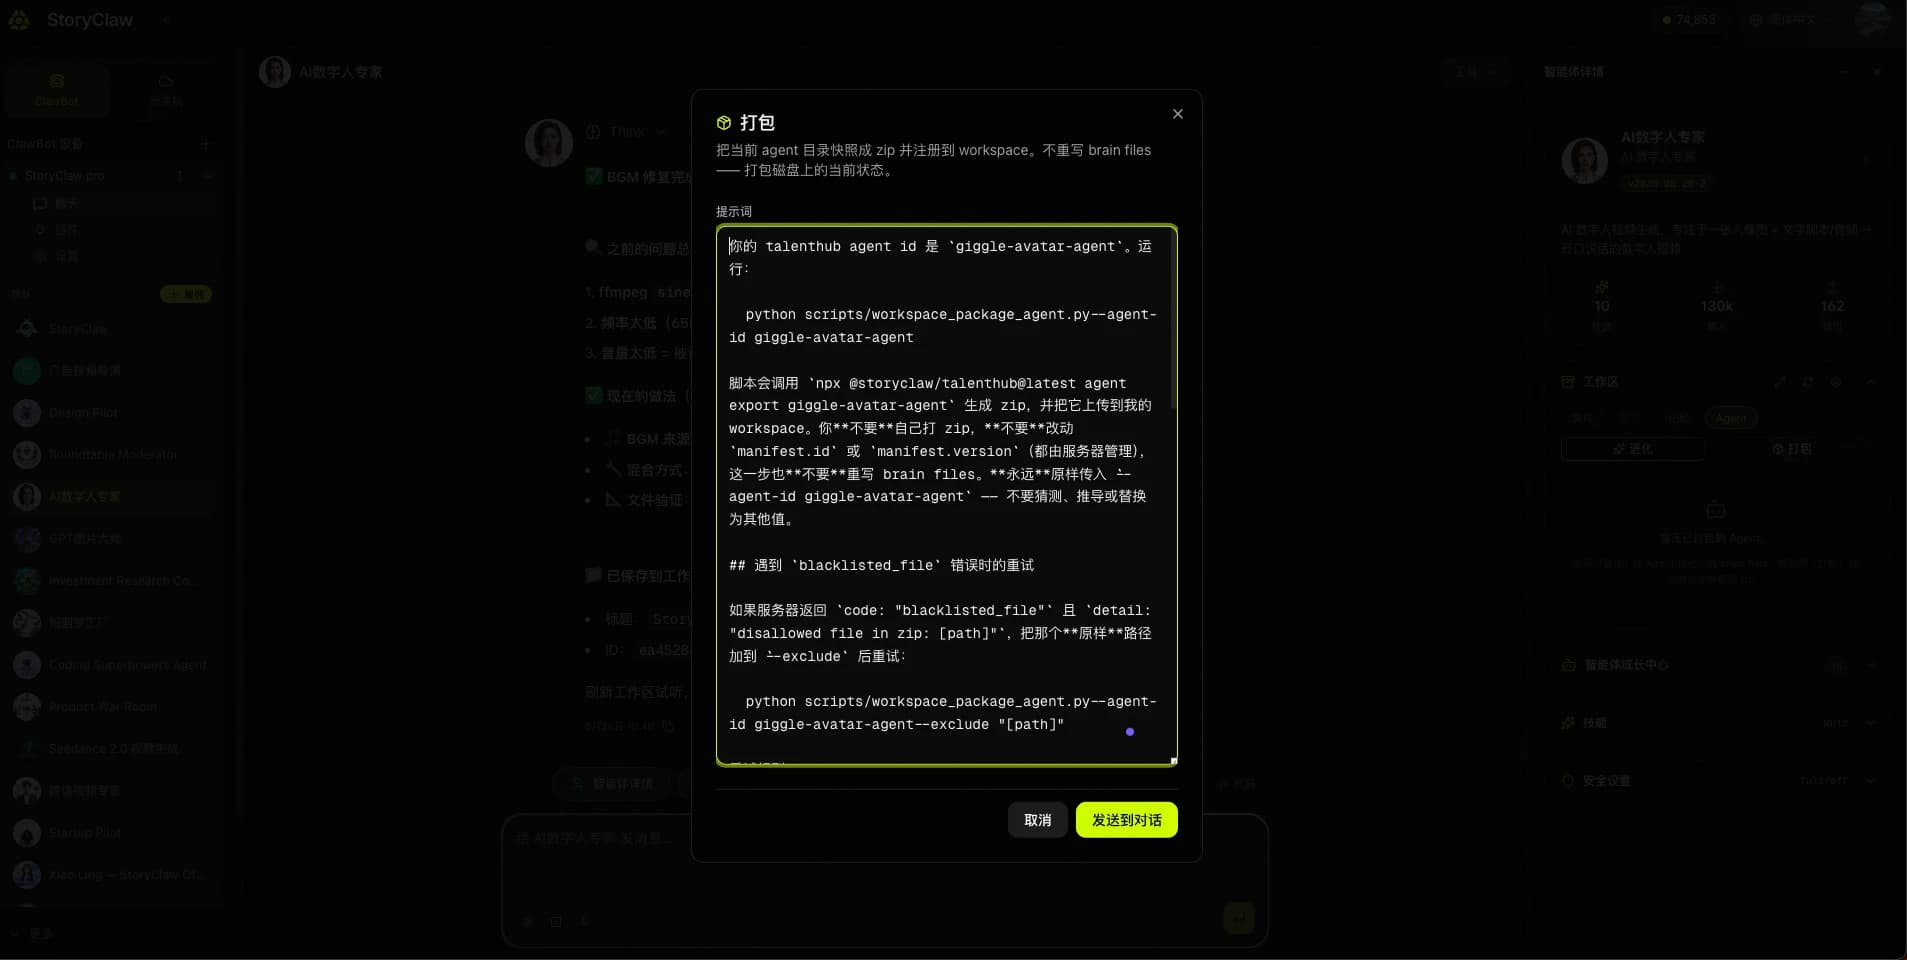
The Agent Archive manages snapshot versions of the Agent itself, with two actions:
| Action | Description |
|---|---|
| Evolve | Agent reflects on its current config and auto-generates improvements. Run Evolve before packaging to ensure the snapshot captures the latest state |
| Package | Click "Package" to open the prompt panel, then click "Send to chat" — the Agent automatically packages its full current state as a zip and uploads it to the Agent Archive |
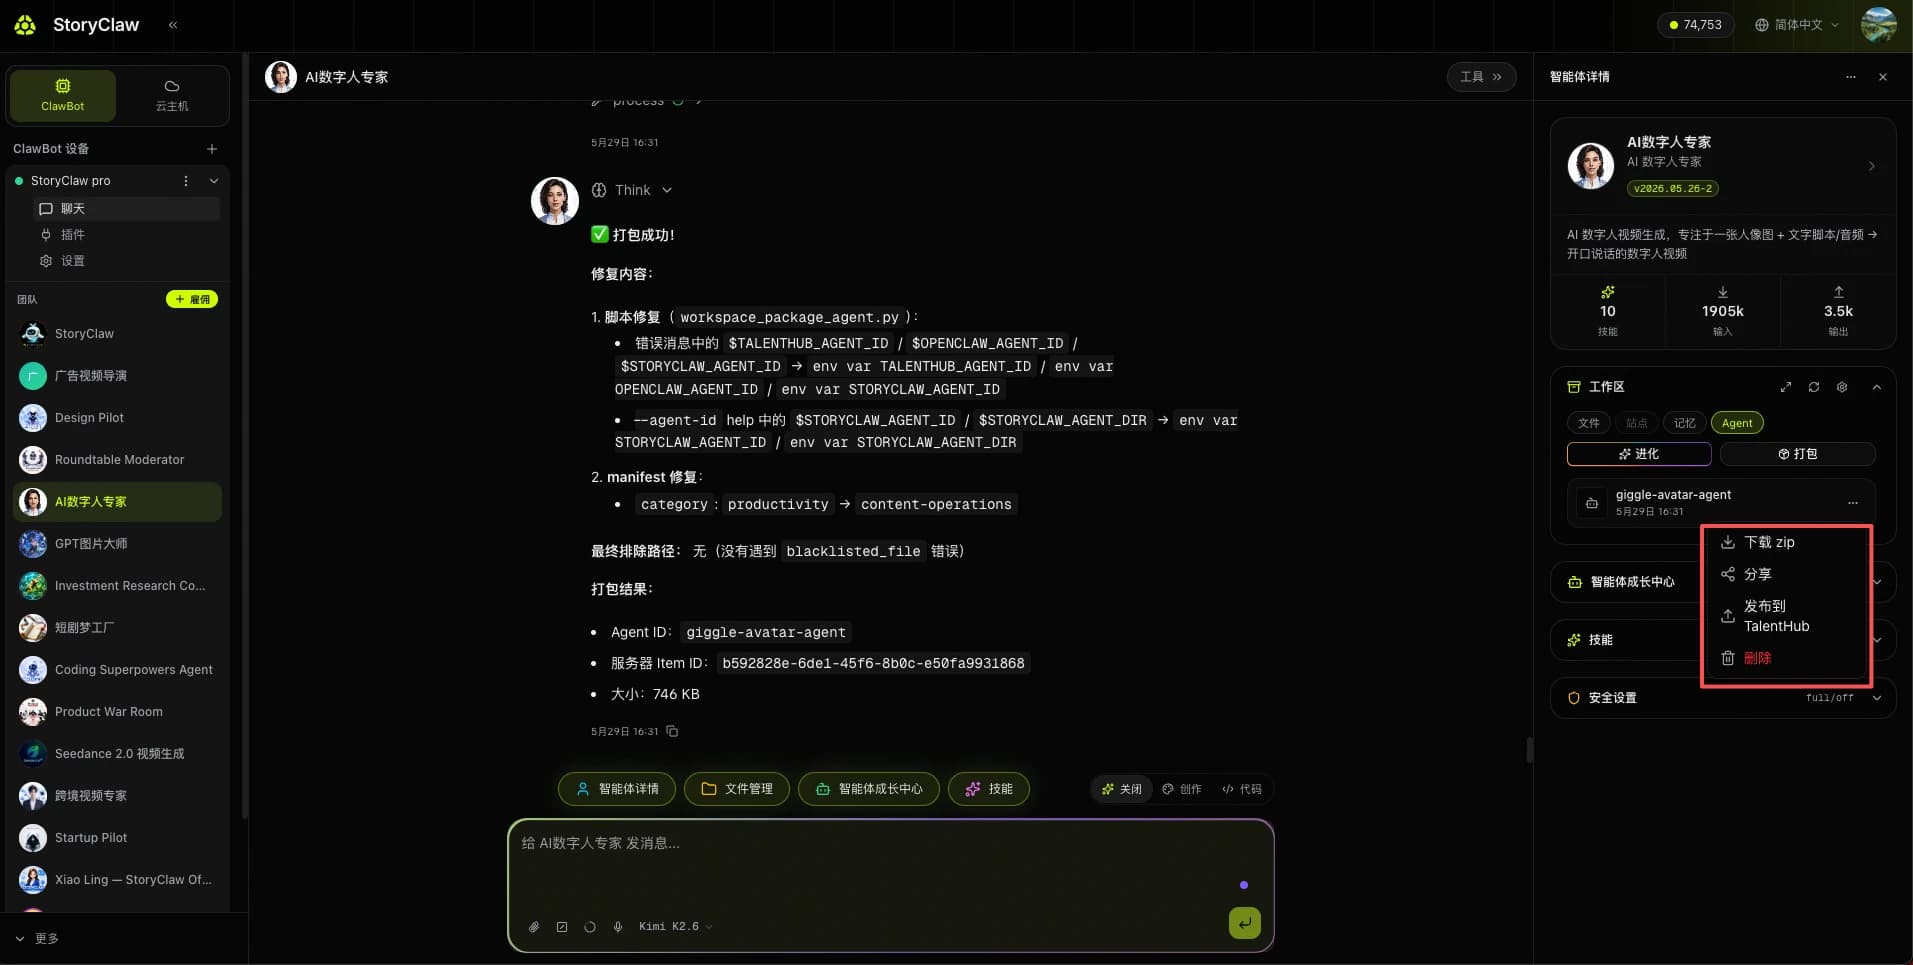
Once packaged, the zip appears in the Agent Archive list. Click "…" on the right to choose:
| Action | Description |
|---|---|
| Download zip | Download the full Agent snapshot locally for backup or migration |
| Share | Generate a share link — other users can hire this Agent directly via the link without any manual setup |
| Publish to TalentHub | Publish the Agent to the AI Talent Market so any user can search and hire it |
| Delete | Permanently delete the snapshot — this cannot be undone |
Agent Share & Hire
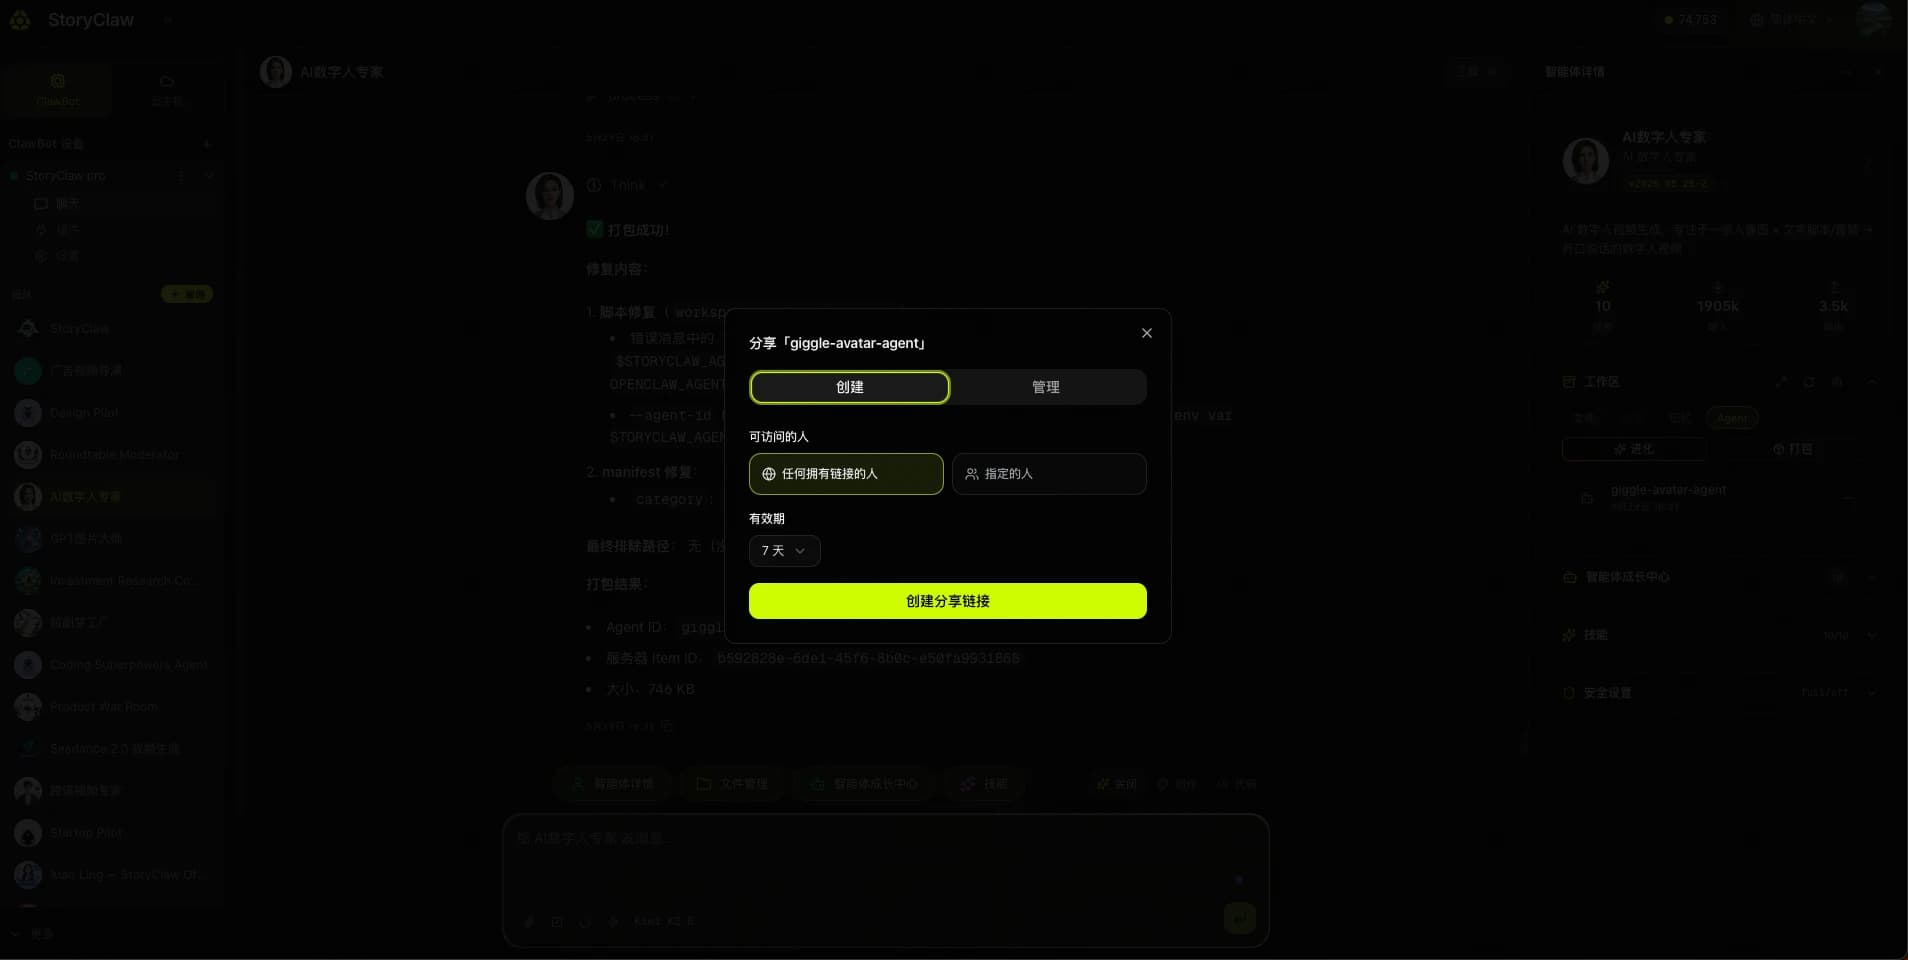
Click "Share" to open the share panel. Recipients can hire this Agent directly via the link — no need to reconfigure prompts or skills.
| Setting | Description |
|---|---|
| Anyone with the link | Public share — any user with the link can hire this Agent |
| Specific people | Invite specific accounts only — suitable for passing Agents within a team |
| Expiration | Set how many days the link remains valid before expiring automatically |
③ Agent Growth Center
The Growth Center offers instantly activatable behavior recipes. Each recipe injects a new working protocol or capability into the Agent. The number in the top-right shows how many recipes are currently available.
- Behavior — Progress Report (no silent execution), Task Breakdown (with time estimates), Large File Chunking, Meeting Notes, Retrospective, Devil's Advocate
- Evolution — Dream Recipe (auto self-reflection when idle), Evolve (assess weaknesses and draft improvements)
- Memory — Proactive Memory Optimization (faster retrieval), Memory-Wiki Structured Memory
- Security — Security Hardening (auto-audit tool permissions, env vars, and external calls)
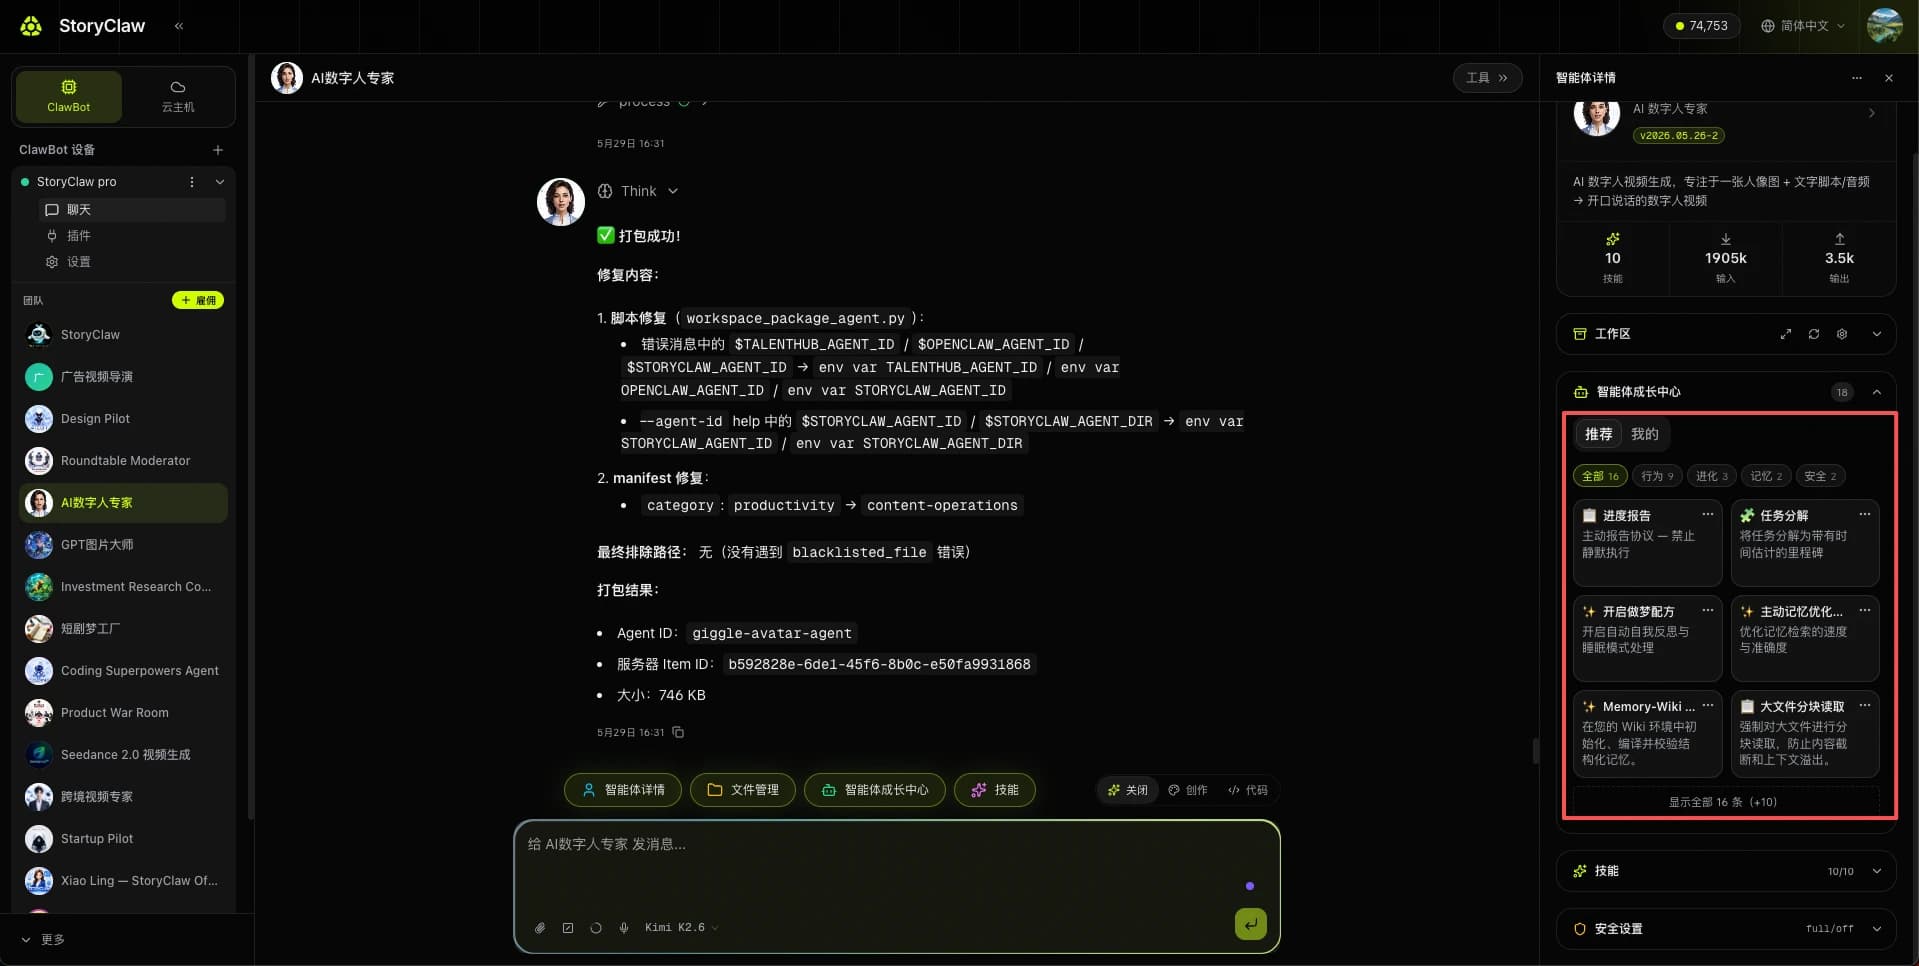
How to use: Browse in "Recommended" or "All" → click to view details → click Apply.
④ Skills
Skills are tool plugins the Agent can invoke — they determine what it can do. Without skills, the Agent can only chat; with skills, it can take real action. The panel header shows "Installed / Available" count; each skill shows its current status (Ready / Error).
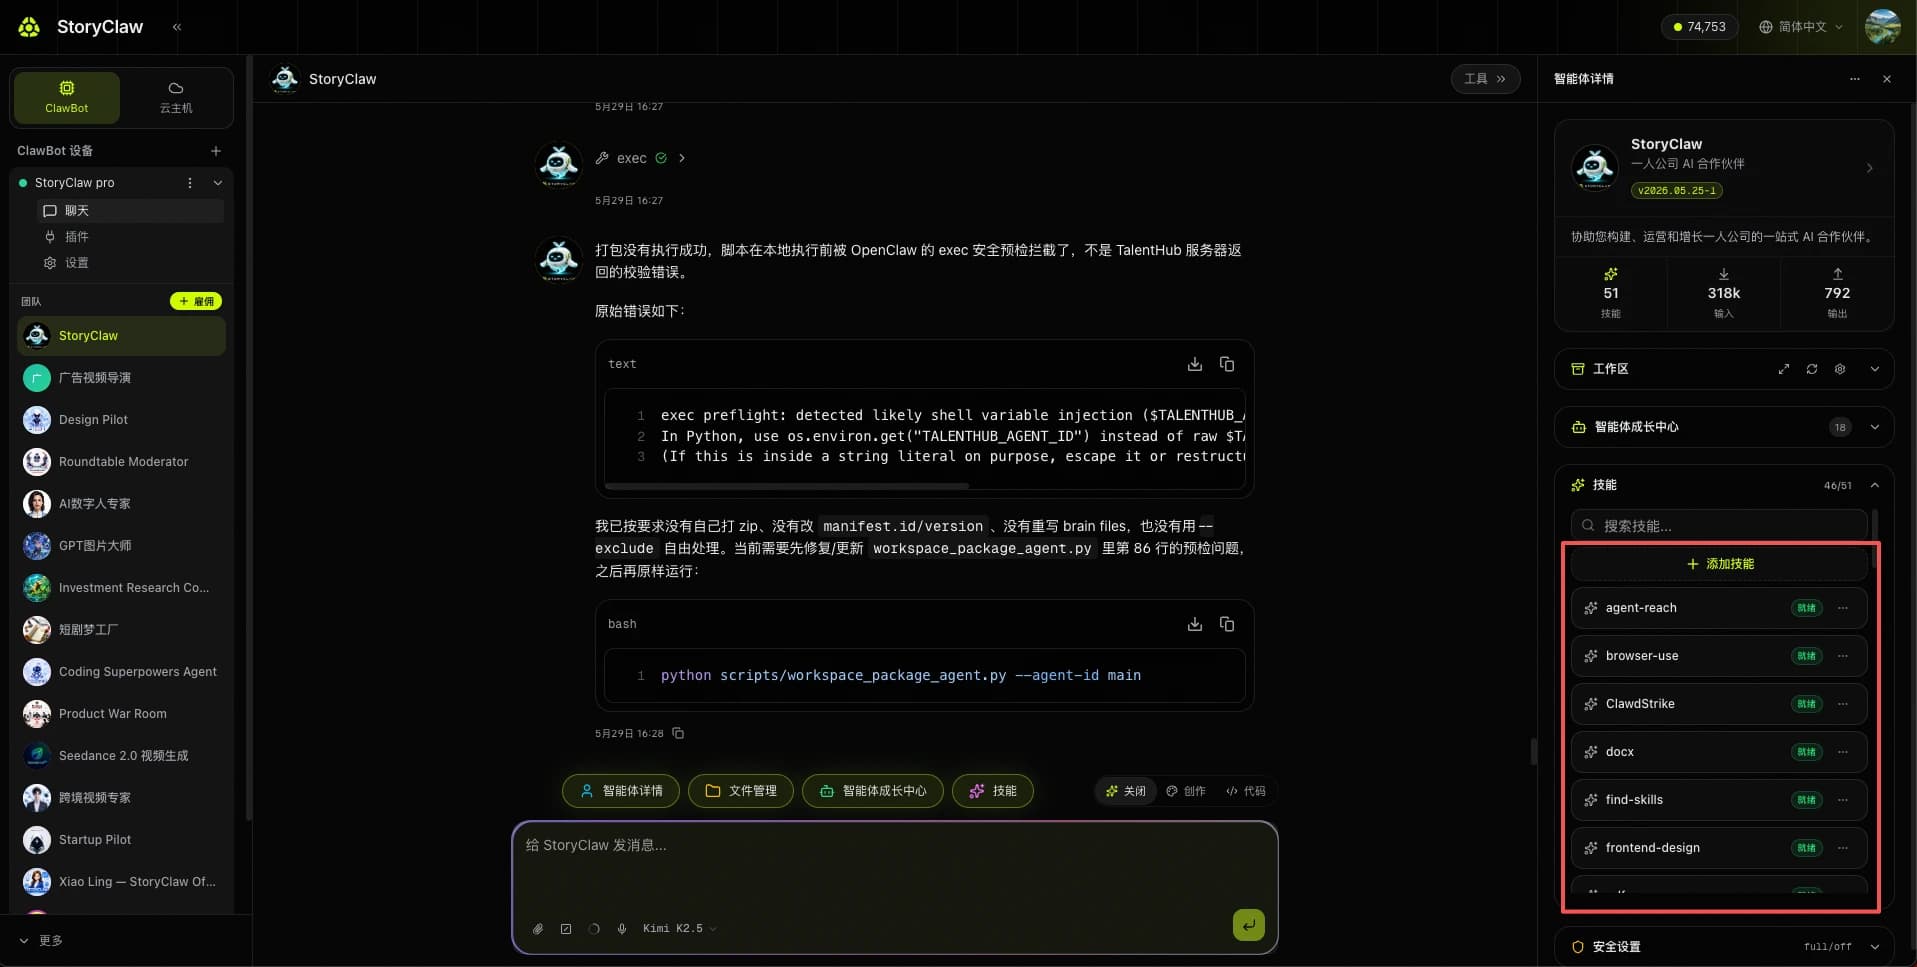
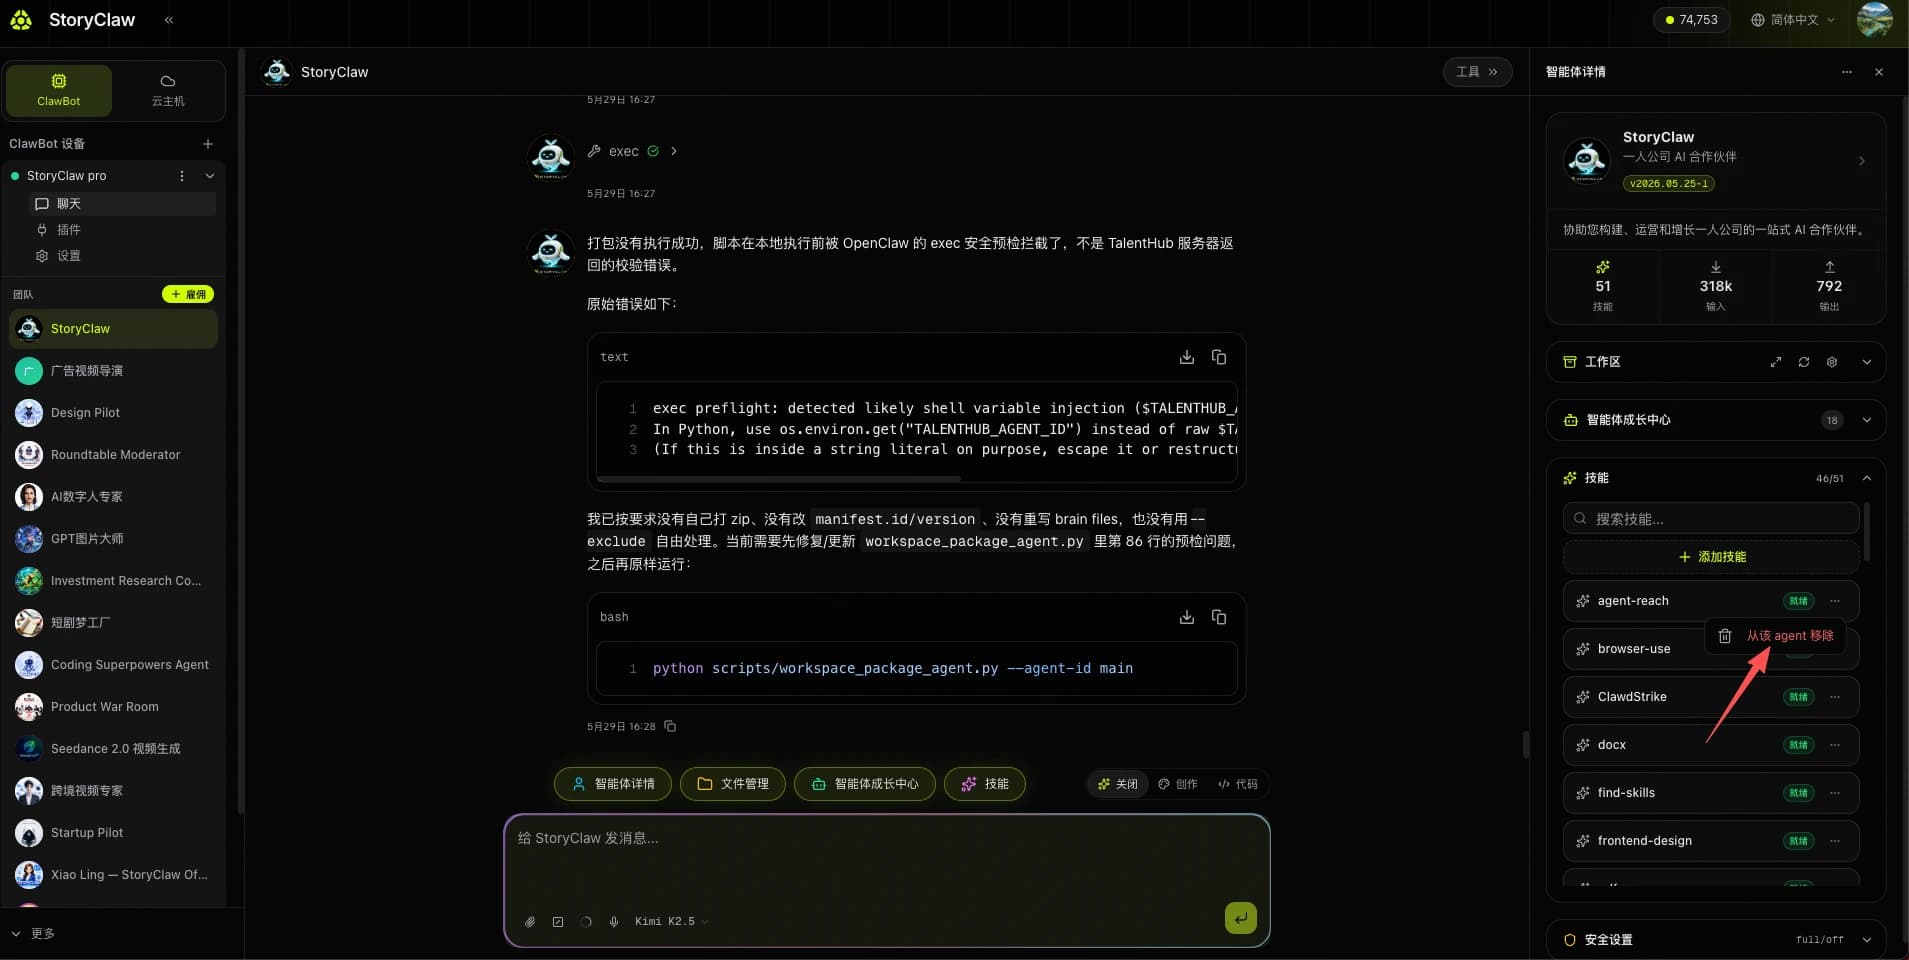
Remove a Skill
Click "…" on the right of a skill and select "Remove from this Agent" to uninstall it. Removing a skill here only affects this Agent — other Agents are unaffected.
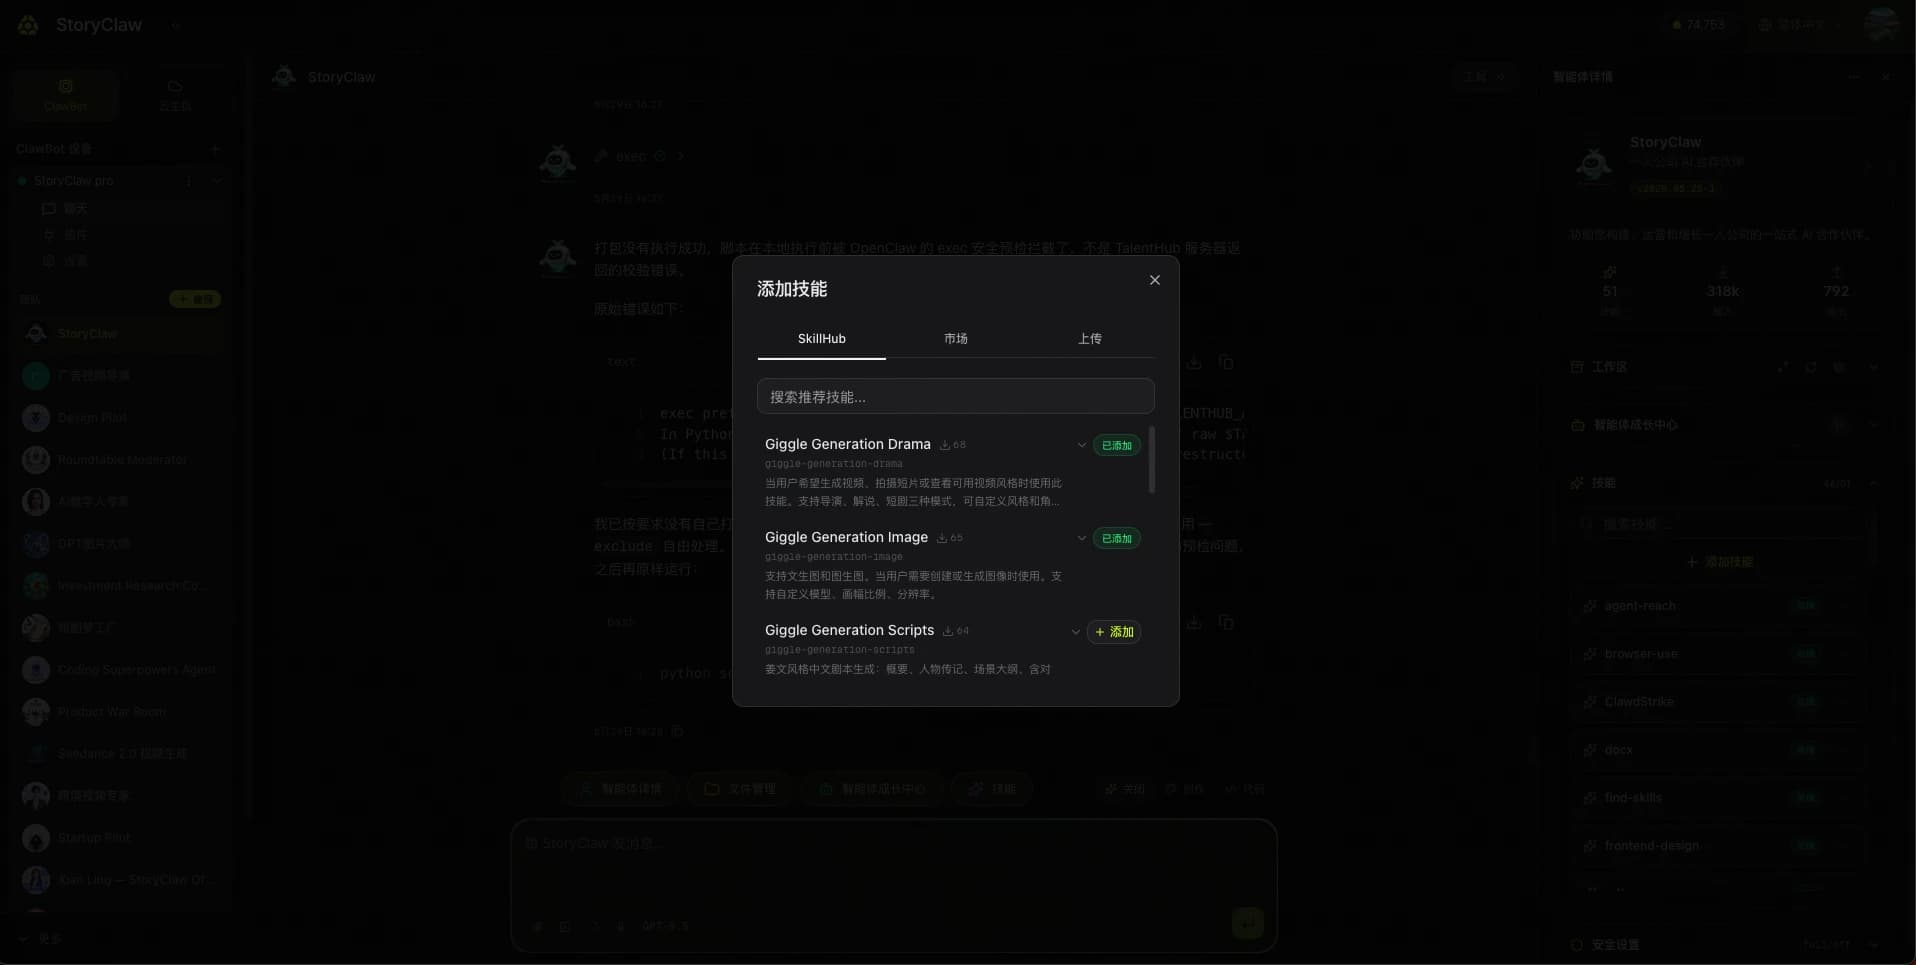
Add a Skill
Click "+ Add Skill" to open the add panel. Three sources are available:
- SkillHub — StoryClaw's officially verified skill library — quality-assured; search and add in one click
- Market — Third-party skills published by the community — wide variety; review the description and ratings before installing
- Upload — Upload a custom skill package from your local machine — for developers integrating private tools into the Agent
Install only what the Agent needs — too many skills consume context window space and may affect response quality.
⑤ Security Settings
Security Settings control the permission level and approval mode for commands the Agent executes. Two options are available:
| Setting | Options | Description |
|---|---|---|
| Security Level | Full open (allow any command) | Default. The Agent can execute any command without restrictions — suitable for personal devices where efficiency is the priority |
| Approval Prompt | Off (execute without approval) | Off by default. When enabled, a confirmation prompt appears before each command — recommended for environments with stricter security requirements |
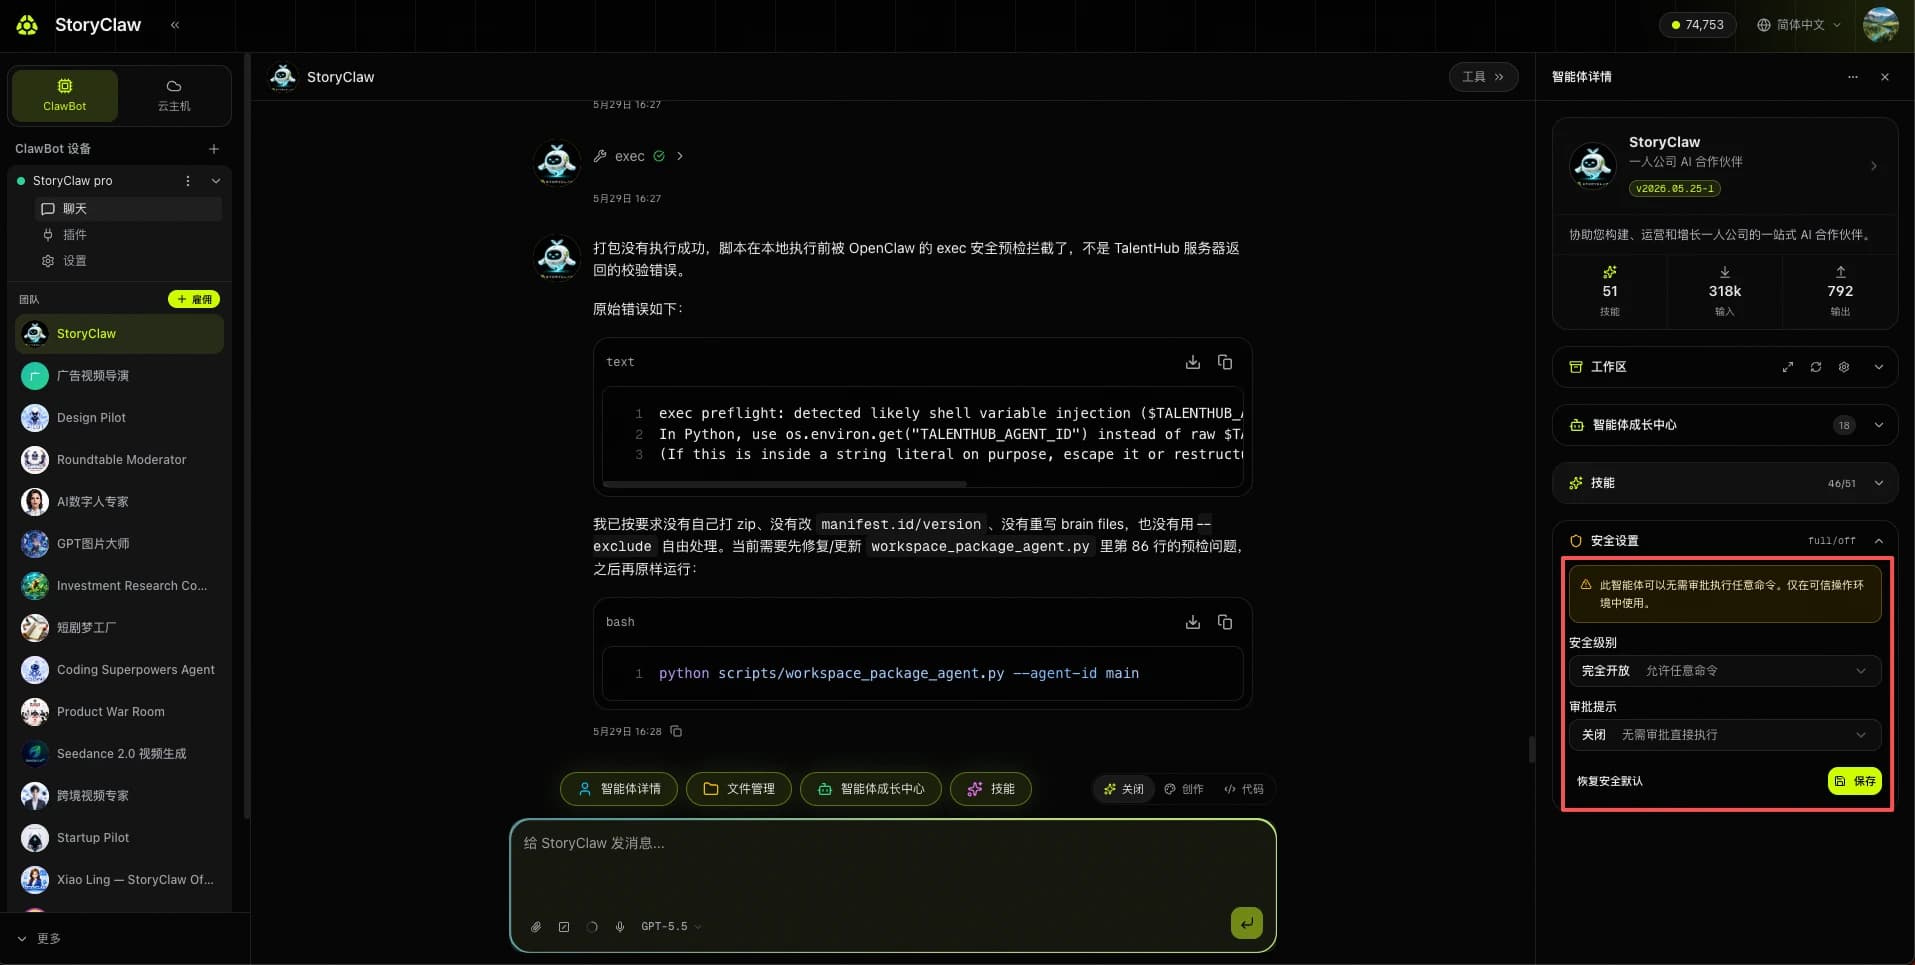
The default (Full open + Approval off) is fine for most scenarios. For shared or enterprise devices, consider enabling Approval Prompt or tightening the Security Level. Click "Restore Security Defaults" to reset to the initial configuration.